Canon VB-S900F Mark II Network Camera Operation Guide - Page 42
Steps for Setting Up the Camera, Step 1 Preparing to Install the camera, Step 2 Installing the Camera
 |
View all Canon VB-S900F Mark II manuals
Add to My Manuals
Save this manual to your list of manuals |
Page 42 highlights
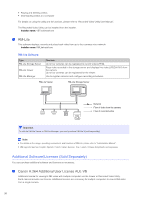
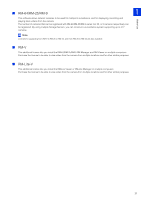
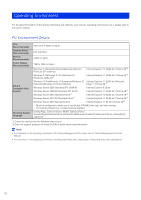
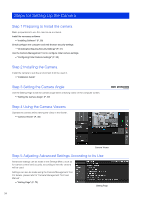
Steps for Setting Up the Camera Step 1 Preparing to Install the camera Make preparations to use the camera via a network. Install the necessary software "Installing Software" (P. 28) Check/configure the computer and web browser security settings "Checking/Configuring Security Settings" (P. 31) Use the Camera Management Tool to configure initial camera settings. "Configuring Initial Camera Settings" (P. 35) Step 2 Installing the Camera Install the camera to suit the environment it will be used in. "Installation Guide" Step 3 Setting the Camera Angle Use the Setting Page to set the camera angle while checking video on the computer screen. "Setting the Camera Angle" (P. 37) Step 4 Using the Camera Viewers Operate the camera while viewing the video in the Viewer. "Camera Viewer" (P. 39) H730 S80x S90x Camera Viewer Step 5 Adjusting Advanced Settings According to Its Use Advanced settings can be made in the Settings Menu, such as for camera control and security, according to how the camera will be used. Settings can also be made using the Camera Management Tool. For details, please refer to "Camera Management Tool User Manual". "Setting Page" (P. 75) Setting Page 24
-
 1
1 -
2
-
3
-
4
-
5
-
6
-
7
-
8
-
9
-
10
-
11
-
12
-
13
-
14
-
15
-
16
-
17
-
18
-
19
-
20
-
21
-
22
-
23
-
24
-
25
-
26
-
27
-
28
-
29
-
30
-
31
-
32
-
33
-
34
-
35
-
36
-
 37
37 -
 38
38 -
 39
39 -
 40
40 -
 41
41 -
 42
42 -
 43
43 -
 44
44 -
 45
45 -
 46
46 -
 47
47 -
48
-
49
-
50
-
51
-
52
-
53
-
54
-
55
-
56
-
57
-
58
-
59
-
60
-
61
-
62
-
63
-
64
-
65
-
66
-
67
-
68
-
69
-
70
-
71
-
72
-
73
-
74
-
75
-
76
-
77
-
78
-
79
-
80
-
81
-
82
-
83
-
84
-
85
-
86
-
87
-
88
-
89
-
90
-
91
-
92
-
93
-
94
-
95
-
96
-
97
-
98
-
99
-
100
-
101
-
102
-
103
-
104
-
105
-
106
-
107
-
108
-
109
-
110
-
111
-
112
-
113
-
114
-
115
-
116
-
117
-
118
-
119
-
120
-
121
-
122
-
123
-
124
-
125
-
126
-
127
-
128
-
129
-
130
-
131
-
132
-
133
-
134
-
135
-
136
-
137
-
138
-
139
-
140
-
141
-
142
-
143
-
144
-
145
-
146
-
147
-
148
-
149
-
150
-
151
-
152
-
153
-
154
-
155
-
156
-
157
-
158
-
159
-
160
-
161
-
162
-
163
-
164
-
165
-
166
-
167
-
168
-
169
-
170
-
171
-
172
-
173
-
174
-
175
-
176
-
177
-
178
-
179
-
180
-
181
-
182
-
183
-
184
-
185
-
186
-
187
-
188
-
189
-
190
-
191
-
192
-
193
-
194
-
195
-
196
-
197
-
198
-
199
-
200
-
201
-
202
-
203
-
204
-
205
-
206
-
207
-
208
-
209
-
210
-
211
-
212
-
213
-
214
-
215
-
216
-
217
-
218
-
219
-
220
-
221
-
222
-
223
-
224
-
225
-
226
-
227
-
228
-
229
-
230
-
231
-
232
-
233
-
234
-
235
-
236
-
237
-
238
-
239
-
240
-
241
-
242
-
243
-
244
-
245
-
246
-
247
-
248
-
249
-
250
-
251
-
252
-
253
-
254
-
255
-
256
-
257
-
258
-
259
-
260
 |
 |