Canon VIXIA HG10 Corel Application Disc Ver.2 Instruction Manual - Page 10
Editing Movies with DVD MovieFactory
 |
View all Canon VIXIA HG10 manuals
Add to My Manuals
Save this manual to your list of manuals |
Page 10 highlights
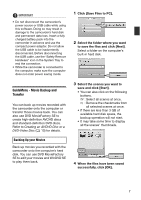
NOTES • The date and time of movies transferred back to the camcorder will reflect the time of their transfer. • Movies recorded with this camcorder have a maximum file size of 2 GB (about 17 min. in HXP mode; about 35 min. in SP mode). Longer scenes will be divided into files smaller than 2 GB. They will be saved as separate scenes when transferred to a computer. • In Windows Vista, when transferring movies back to the camcorder from an AVCHD disc created with DVD MovieFactory SE, first insert the disc into the computer's DVD drive and copy the movies onto the computer's hard disk. On the original AVCHD disc, movies are saved with the file name xxxxx.m2ts, where "xxxxx" is a five-digit number, in the following path on the computer's DVD drive: BDMV\STREAM. Then, in step 2, select the folder to which the movies were copied. • In Windows XP, when transferring movies back to the camcorder from an AVCHD disc created with DVD MovieFactory SE, first import the movies on the disc into DVD MovieFactory SE and then export the movies to the computer as AVCHD files. Then, in step 2, select the folder to which the movies were exported. ( 12) Additional Software in the Corel Application Disc CD-ROM Editing Movies with DVD MovieFactory SE Use this editing software to touch up (cut, delete and move) movies transferred to your computer with GuideMenu, to add music, titles and transition effects and to create your own DVDs with personalized menus. For further details, refer to the help files in the DVD MovieFactory SE software. CREATING AN AVCHD DISC OR A DVD-VIDEO DISC You can create a high-definition AVCHD disc or standard definition DVD disc with movies on the camcorder you have backed up onto your computer. 1 Connect the camcorder to the computer. Refer to Connecting the Camcorder to the Computer ( 6). 2 Back up the movies on the camcorder onto your computer. Refer to Backing Up your Movies ( 7). 3 Insert a standard-size (12 cm) DVD disc into the DVD drive. You can use either a DVD-RW or a brand new DVD-R disc. 10
-
 1
1 -
2
-
3
-
4
-
 5
5 -
 6
6 -
 7
7 -
 8
8 -
 9
9 -
 10
10 -
 11
11 -
 12
12 -
 13
13 -
 14
14 -
 15
15 -
16
 |
 |