Canon VIXIA HG10 Corel Application Disc Ver.2 Instruction Manual - Page 6
the procedure as described.
 |
View all Canon VIXIA HG10 manuals
Add to My Manuals
Save this manual to your list of manuals |
Page 6 highlights
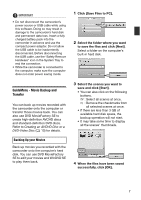
5 Enter the activation code (serial number) you received over the Internet and click [Activate]. Connecting the Camcorder to the Computer 6 Once the activation is completed, click [OK]. 7 Select [Yes, I want to restart my computer now.] and click [Finish]. IF YOU CANNOT CONNECT TO THE INTERNET 1 Call one of the customer support centers listed on the back cover to get the activation code over the phone. 2 Skip directly to step 5 to enter the activation code and continue with the procedure as described. Connect the camcorder to the computer to back up your files on the camcorder's hard disk or transfer your recordings from the computer back to the camcorder. You can play back your recordings (using WinDVD SE) or edit your recordings (using DVD MovieFactory SE) directly from your computer's hard disk without having to connect the camcorder. For further details, refer to the help files in the respective software. 1 Connect the camcorder to a power outlet. Insert a fully charged battery pack into the camcorder and power the camcorder using the compact power adapter. 2 Turn on the camcorder and set it in video playback mode. Refer to the camcorder's instruction manual. 3 Connect the camcorder to the computer using the USB cable. • The GuideMenu screen will appear automatically. • If it does not, double-click the desktop icon to launch the GuideMenu application. 6
-
 1
1 -
 2
2 -
 3
3 -
 4
4 -
 5
5 -
 6
6 -
 7
7 -
 8
8 -
 9
9 -
 10
10 -
 11
11 -
 12
12 -
13
-
14
-
15
-
16
 |
 |
