Canon VIXIA HG10 Corel Application Disc Ver.2 Instruction Manual - Page 12
Select [AVCHD] and click [OK].
 |
View all Canon VIXIA HG10 manuals
Add to My Manuals
Save this manual to your list of manuals |
Page 12 highlights
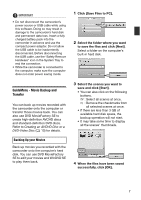
13 Check the settings and click [Burn]. You can change the settings if necessary. 14 Select an option and click [OK]. IMPORTANT • High-definition discs created or copied using Corel software can be played back only with AVCHD-compatible DVD players. Do not insert such discs into a DVD player that is not compatible with AVCHD specifications as you may not be able to eject the disc. • When using a computer that has only one DVD drive to copy a 12 cm disc, you will only be able to use DVD-RW discs; DVD-R and DVD-R DL discs cannot be copied in such case. • Use GuideMenu to transfer movies from the camcorder to your computer. Movies edited with MovieFactory SE that exceed 2 GB cannot be transferred. The following table gives approximate times for a 2 GB scene in each recording mode. Recording Mode Playback time HXP 17 min. XP 28 min. SP 35 min. LP 45 min. NOTES • If you have the editing software Roxio MyDVD for Canon installed in your computer and you specify more than one disc, a disc cannot be created. Set [Copies] to [1]. • To create the same disc again in the future, select [Close DMF with saving project file and go to launcher.] in step 14 and click [OK]. The next time you create that same disc, select [Open Existing Project] to open the saved project. EXPORTING MOVIES ON AN AVCHD DISC TO THE COMPUTER You can use DVD MovieFactory SE to import movies from an AVCHD disc and export them to an AVCHD file. 1 Insert an AVCHD disc into the computer's DVD drive. 2 Click [Authoring]. 3 Click [Video disc] and then [New project]. 4 Select [AVCHD] and click [OK]. 12
-
 1
1 -
2
-
3
-
4
-
5
-
6
-
 7
7 -
 8
8 -
 9
9 -
 10
10 -
 11
11 -
 12
12 -
 13
13 -
 14
14 -
 15
15 -
 16
16
 |
 |
