Canon iP4600 Getting Started
Canon iP4600 - PIXMA Color Inkjet Printer Manual
 |
UPC - 013803093728
View all Canon iP4600 manuals
Add to My Manuals
Save this manual to your list of manuals |
Canon iP4600 manual content summary:
- Canon iP4600 | Getting Started - Page 1
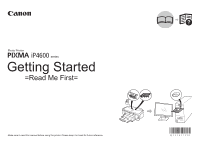
Photo Printer iP4600 series Getting Started =Read Me First= Make sure to read this manual before using the printer. Please keep it in hand for future reference. - Canon iP4600 | Getting Started - Page 2
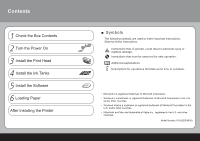
3 Install the Print Head 4 Install the Ink Tanks 5 Install the Software 6 Loading Paper After Installing the Printer ■ Symbols The following symbols are used to mark important instructions. Observe these instructions. Instructions that, if ignored, could result in personal injury or material damage - Canon iP4600 | Getting Started - Page 3
1 Check the Box Contents 123456 Print Head ink tank • Manuals • Setup CD-ROM (containing the drivers, applications and on-screen manuals) • Warranty • MP-101 paper (for Automatic Print Head Alignment) • Before turning on the printer, remove all the protective sheets. • A USB cable is necessary - Canon iP4600 | Getting Started - Page 4
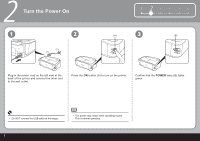
On 1 2 (2) (1) 1234 5 6 (A) 3 (B) Plug in the power cord on the left side at the back of the printer and connect the other end to the wall outlet. Press the ON button (A) to turn on the printer. Confirm that the POWER lamp (B) lights green. • Do NOT connect the USB cable at this stage - Canon iP4600 | Getting Started - Page 5
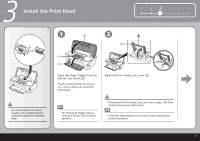
Lock Lever until it stops. (The Print Head Lock Lever may feel heavy.) • If the Print Head Holder does not move, make sure that the printer is turned on. 3 - Canon iP4600 | Getting Started - Page 6
3 Install the Print Head 3 4 1 234 5 6 5 (D) Remove the Print Head from the silver package. Remove and discard the orange protective cap. Tilt the Print Head and set it in place. Lower the Print Head Lock Lever (D) completely. • There may be some transparent or light blue ink on the inside - Canon iP4600 | Getting Started - Page 7
4 Install the Ink Tanks 1 1 2 34 5 6 2 (A) (1) • Do not handle the ink tanks roughly such as applying them excessive pressure or dropping them. • If the Print Head Holder moves to the right, close and reopen the Top Cover. • Be sure to use the supplied ink tanks. (2) Pull the orange tape - Canon iP4600 | Getting Started - Page 8
the Ink lamp lights red. (C) Close the Top Cover. • Wait until the POWER lamp lights green (about 6 minutes) and go to the next step. • The printer may make some operating noises when preparing to print. This is normal operation. • If an Alarm lamp (C) flashes orange, make sure that the Print Head - Canon iP4600 | Getting Started - Page 9
To use the printer by connecting it to a computer, software including the drivers need to be restart your computer during the installation process. Follow the on-screen instructions and click OK, and do not remove the Setup CD- earlier are not supported. 1 2 3 456 Windows (P.8) Macintosh (P.16) 7 - Canon iP4600 | Getting Started - Page 10
. The screen may close. In this case, proceed from . 2 Click Cancel to quit the screen. 3 Proceed from . Press the ON button (A) to TURN OFF THE PRINTER. Turn on the computer, then insert the Setup CD-ROM into the CD-ROM drive. The setup program should run automatically. Windows Vista Go to - Canon iP4600 | Getting Started - Page 11
3 Windows Vista 4 Windows Vista 1 2 3 456 AutoPlay screen appears, click Run Msetup4.exe. User Account Control screen appears, click Continue. If the same screen reappears in subsequent steps, click Continue. 9 - Canon iP4600 | Getting Started - Page 12
Windows 5 6 7 Click Easy Install. The drivers, application software, and on-screen manuals are installed automatically. Click Install. Move the cursor Install and follow the on-screen instructions to proceed with the installation. 10 • Follow any on-screen instructions to install the software. - Canon iP4600 | Getting Started - Page 13
screen appears, connect one end of the USB cable to the computer, the other to the printer, then TURN THE PRINTER ON. • It takes about 15 seconds for the POWER lamp to light green. • When the printer is recognized by the computer, a message appears on the screen. • If you cannot go to the - Canon iP4600 | Getting Started - Page 14
5 Windows 9 Align the Print Head 10 (C) When the Print Head Alignment screen appears, load a sheet of supplied speciality paper (MP-101) in the Rear Tray (C). Click Execute. • Be sure to use the supplied speciality paper (MP-101) for Automatic Print Head Alignment. • MP-101 cannot be fed from - Canon iP4600 | Getting Started - Page 15
, the Alarm lamp will flash orange 11 times. In this case, refer to "When Printing Becomes Faint or Colors Are Incorrect" in the on-screen manual: Basic Guide. • The pattern is printed in blue and black. 13 - Canon iP4600 | Getting Started - Page 16
5 Windows 13 14 (E) When the Load plain paper into the cassette screen appears, load plain paper in the Cassette (E) and click Next. Click Next. It may take a while for the next screen to appear. Click Next only once. • For details, refer to "6 Loading Paper" on page 22. 14 - Canon iP4600 | Getting Started - Page 17
If connected to the Internet, the user registration page appears. Follow the onscreen instructions to register your product. You will need your product serial number, which is located on the inside of the printer. • Internet connection is required. (Connection fees apply.) When the Extended Survey - Canon iP4600 | Getting Started - Page 18
Connect one end of the USB cable to the computer and the other to the printer. Make sure the printer is turned on. Turn on the computer, then insert the Setup CD-ROM into or password, click Help, then follow the onscreen instructions. • The USB port is located on the right side at the back of the - Canon iP4600 | Getting Started - Page 19
3 456 5 6 7 Click Easy Install. The drivers, application software, and on-screen manuals are installed automatically. Click Install. Move the cursor Install and follow the on-screen instructions to proceed with the installation. • Follow any on-screen instructions to install the software. 17 - Canon iP4600 | Getting Started - Page 20
5 8 Macintosh 9 10 Align the Print Head (A) When the Start Setup screen appears, click Execute. Click Restart. The Print Head Alignment screen appears after the computer has been restarted. Load a sheet of supplied speciality paper (MP-101) into the Rear Tray (A). • Be sure to use the supplied - Canon iP4600 | Getting Started - Page 21
11 Click Execute. 1 2 3 456 12 (B) When this screen appears, click OK. Printing of the pattern starts. • Wait until the pattern printing ends (about 7 minutes), and go to the next step. • Make sure that the Output Tray Extension (B) is extended. 19 - Canon iP4600 | Getting Started - Page 22
, the Alarm lamp will flash orange 11 times. In this case, refer to "When Printing Becomes Faint or Colors Are Incorrect" in the on-screen manual: Basic Guide. • The pattern is printed in blue and black. • For details, refer to "6 Loading Paper" on page 22. 20 - Canon iP4600 | Getting Started - Page 23
Next. If connected to the Internet, the user registration page appears. Follow the onscreen instructions to register your product. You will need your product serial number, which is located on the inside of the printer. Click Exit. Remove the Setup CD-ROM and keep it in a safe place. • Internet - Canon iP4600 | Getting Started - Page 24
Paper This section explains how to load paper in the Cassette (A) and Rear Tray (B). (D) (B) 1 Load in the Cassette 2 (E) 3 (G) (F) (A) (C) The Cassette (A) supports plain paper (C) only. To print Photo Paper/Hagaki (D), be sure to load it in the Rear Tray (B). (A) Pull out the Cassette - Canon iP4600 | Getting Started - Page 25
exceed the Load Limit Mark (I). Attach the Cover (E) and insert the Cassette into the printer until it clicks into place. • Load paper with the printing side facing down. • There may be a little space between the Paper Guide and the paper stack. • To print on speciality paper, be sure to load it - Canon iP4600 | Getting Started - Page 26
and pull up the Paper Support (K). Move the Paper Guides (L) to both edges. Load paper in the center of the Rear Tray. (L) (L) Slide the left and right Paper Guides (L) against both edges of the to "Loading Paper" in the on-screen manual: Basic Guide. Printer installation is now complete! 24 - Canon iP4600 | Getting Started - Page 27
before using the product. Getting Started (this manual) Basic Guide (on-screen manual) Advanced Guide (on-screen manual) Describes how to set up and use your printer. Introduces the printer and its functions, the included manuals and application software. Describes the basic operations and - Canon iP4600 | Getting Started - Page 28
! Example: Windows Vista Open various applications and on-screen manuals with a single click. You can start Solution Menu from the Solution Menu icon on the desktop (Windows) or on the Dock (Macintosh). If you have a problem with printer settings, click the Change settings or find solutions to - Canon iP4600 | Getting Started - Page 29
allows you to print in various ways using the printer driver and application software installed on the computer. For example, you can print borderless photos, and create your own calendar etc. easily. For detailed operating procedures and functions, refer to the on-screen manuals. Now let's use the - Canon iP4600 | Getting Started - Page 30
Click Print. Printing will start. • For opening Solution Menu, refer to "Solution Menu" on page 26. • For more information refer to the on-screen manual: Advanced Guide. 28 • For details, refer to "6 Loading Paper" on page 22. • On Macintosh, if the Print screen is displayed, click Print to start - Canon iP4600 | Getting Started - Page 31
296(D) x 153(H) mm * With the Paper Support and Paper Output Tray retracted. Weight Approx. 5.7 manuals Browser: Easy Guide Viewer Browser: Help Viewer Note: Microsoft Internet Explorer 6.0 or Note: The on-screen manual bundled with the Canon inkjet printer. About Consumables Consumables - Canon iP4600 | Getting Started - Page 32
Help from Canon Email Tech Support - www.canontechsupport.com Toll-Free Live Tech Support- (1-800-828-4040) This option provides live telephone technical support, free of service charges, Monday-Friday (excluding holidays), during the warranty period. Telephone Device for the Deaf (TDD) support is
-
 1
1 -
 2
2 -
 3
3 -
 4
4 -
 5
5 -
 6
6 -
 7
7 -
8
-
9
-
10
-
11
-
12
-
13
-
14
-
15
-
16
-
17
-
18
-
19
-
20
-
21
-
22
-
23
-
24
-
25
-
26
-
27
-
28
-
29
-
30
-
31
-
32
 |
 |
Getting Started
Make sure to read this manual before using the printer. Please keep it in hand for future reference.
iP4600
=Read Me First=
series
Photo Printer