Canon iP4600 Getting Started - Page 5
Install the Print Head
 |
UPC - 013803093728
View all Canon iP4600 manuals
Add to My Manuals
Save this manual to your list of manuals |
Page 5 highlights
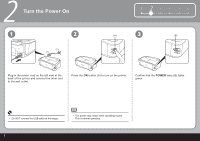
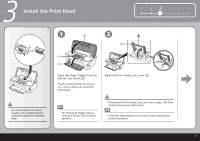
3 Install the Print Head 1 234 5 6 • Do not handle the Print Head roughly such as applying them excessive pressure or dropping them. 1 (B) 2 (D) (C) (A) Open the Paper Output Tray (A) and the Top Cover (B). The Print Head Holder (C) comes out. (This is where you install the Print Head.) Raise the Print Head Lock Lever (D). • The Print Head Holder makes a noise as it moves. This is normal operation. • Firmly raise the Print Head Lock Lever until it stops. (The Print Head Lock Lever may feel heavy.) • If the Print Head Holder does not move, make sure that the printer is turned on. 3
-
 1
1 -
 2
2 -
 3
3 -
 4
4 -
 5
5 -
 6
6 -
 7
7 -
 8
8 -
 9
9 -
 10
10 -
 11
11 -
12
-
13
-
14
-
15
-
16
-
17
-
18
-
19
-
20
-
21
-
22
-
23
-
24
-
25
-
26
-
27
-
28
-
29
-
30
-
31
-
32
 |
 |

3
1
2
3
4
5
6
(B)
(A)
(C)
(D)
3
1
2
Install the
Print Head
Open the
Paper Output Tray (A)
and the
Top Cover (B).
Raise the
Print Head Lock Lever (D).
Firmly raise the
Print Head Lock Lever until it stops. (The
Print
Head Lock Lever may feel heavy.)
•
If the
Print Head Holder does not move, make sure that the
printer is turned on.
•
The
Print Head Holder (C) comes
out. (This is where you install the
Print Head.)
Do not handle the
Print Head
roughly such as applying them
excessive pressure or dropping
them.
•
The
Print Head Holder makes a
noise as it moves. This is normal
operation.
•