Canon iX7000 iX7000 series Getting Started - Page 15
Insert the clear ink tank straight., Replace the Clear Ink Tank Locking Cover
 |
UPC - 013803103014
View all Canon iX7000 manuals
Add to My Manuals
Save this manual to your list of manuals |
Page 15 highlights
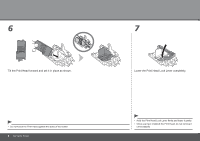
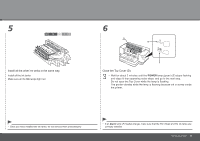
4 5 6 C Insert the clear ink tank straight. Replace the Clear Ink Tank Locking Cover, then press the center firmly until it clicks. Close the Clear Ink Tank Cover. • Once you have installed the clear ink tank, do not remove it unnecessarily. • If an Alarm lamp (C) flashes orange, make sure that the clear ink tank are correctly installed. Set Up the Printer 13
-
 1
1 -
2
-
3
-
4
-
5
-
6
-
7
-
8
-
9
-
 10
10 -
 11
11 -
 12
12 -
 13
13 -
 14
14 -
 15
15 -
 16
16 -
 17
17 -
 18
18 -
 19
19 -
 20
20 -
21
-
22
-
23
-
24
-
25
-
26
-
27
-
28
-
29
-
30
-
31
-
32
-
33
-
34
-
35
-
36
-
37
-
38
-
39
-
40
-
41
-
42
-
43
-
44
-
45
-
46
-
47
-
48
-
49
-
50
-
51
-
52
-
53
-
54
-
55
-
56
-
57
-
58
-
59
-
60
-
61
-
62
 |
 |

±³
4
5
6
C
Set Up the Printer
If an
Alarm
lamp (C) flashes orange, make sure that the clear ink tank are
correctly installed.
•
Insert the clear ink tank straight.
Replace the Clear Ink Tank Locking Cover,
then press the center firmly until it clicks.
Close the Clear Ink Tank Cover.
Once you have installed the clear ink tank, do not
remove it unnecessarily.
•