Canon imageCLASS D340 imageCLASS D340 Set-Up Sheet - Page 4
Installing the Cartridge - toner
 |
View all Canon imageCLASS D340 manuals
Add to My Manuals
Save this manual to your list of manuals |
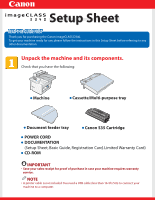
Page 4 highlights
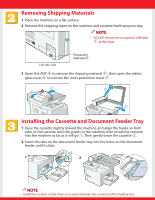
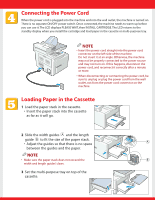
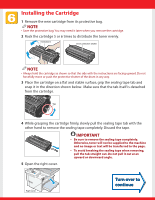
Installing the Cartridge 1 Remove the new cartridge from its protective bag. NOTE • Save the protective bag. You may need it later when you remove the cartridge. 2 Rock the cartridge 5 or 6 times to distribute the toner evenly. Instructions Drum protective shutter NOTE • Always hold the cartridge as shown so that the side with the instructions are facing upward. Do not forcefully move or push the protective shutter of the drum in any way. 3 Place the cartridge on a flat and stable surface, grip the sealing tape tab and snap it in the direction shown below. Make sure that the tab itself is detached from the cartridge. Tab 4 While grasping the cartridge firmly, slowly pull the sealing tape tab with the other hand to remove the sealing tape completely. Discard the tape. IMPORTANT • Be sure to remove the sealing tape completely. Otherwise, toner will not be supplied to the machine and no image or text will be transferred to the page. • To avoid breaking the sealing tape when removing, pull the tab straight out. Do not pull it out at an upward or downward angle. 5 Open the right cover. Right cover Turn over to continue
-
 1
1 -
 2
2 -
 3
3 -
 4
4 -
 5
5 -
 6
6 -
 7
7 -
 8
8
 |
 |
