Canon imageCLASS MF3240 imageCLASS MF3200 Series Basic Guide - Page 127
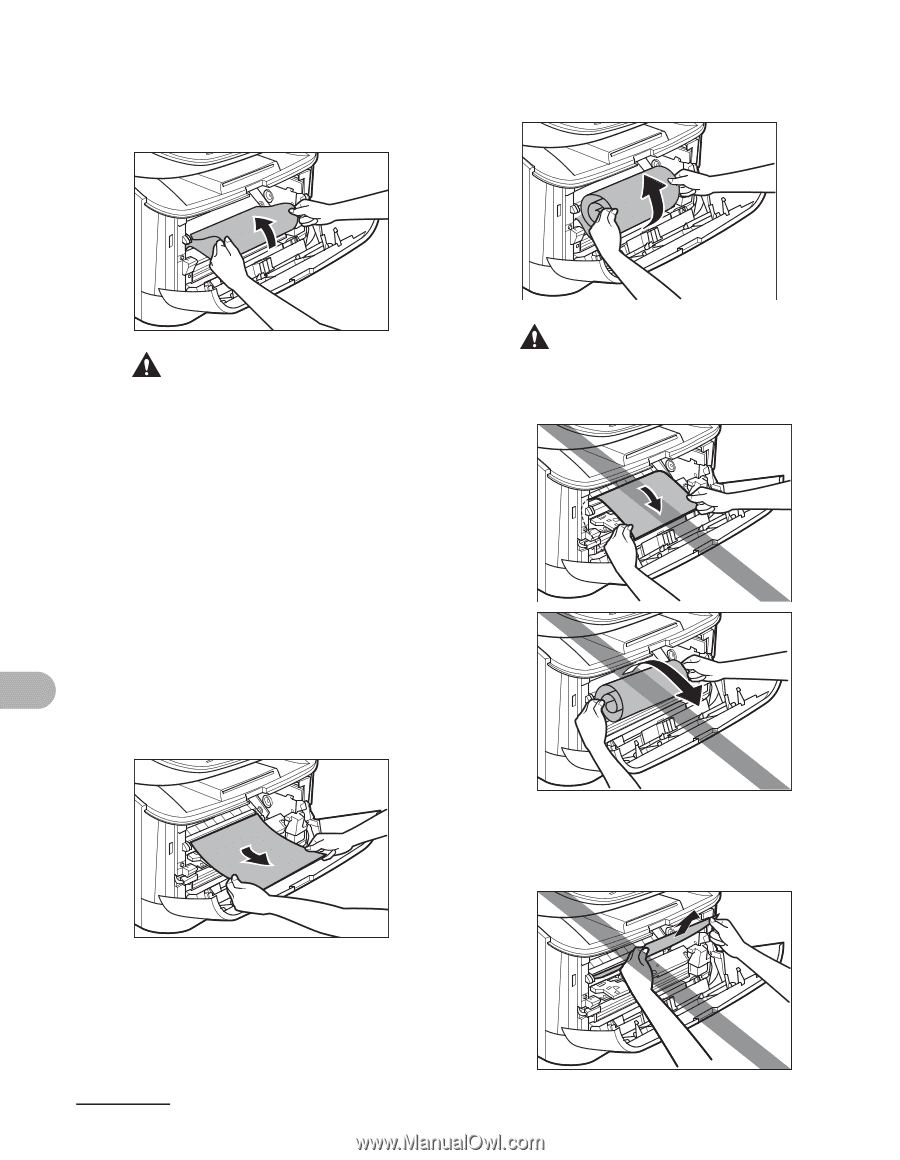
Hold both sides of the jammed, paper and carefully move it, inward, then gently pull it out.
 |
View all Canon imageCLASS MF3240 manuals
Add to My Manuals
Save this manual to your list of manuals |
Page 127 highlights
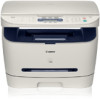
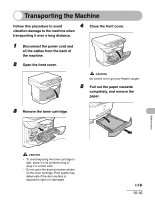
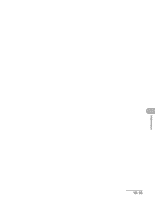
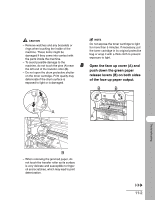
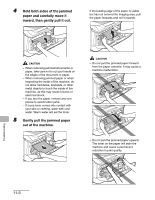
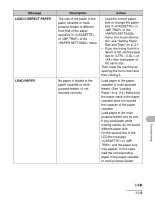
4 Hold both sides of the jammed paper and carefully move it inward, then gently pull it out. If the leading edge of the paper is visible but has not entered the imaging area, pull the paper forwards and roll it inwards. CAUTION - When removing jammed documents or paper, take care not to cut your hands on the edges of the document or paper. - When removing jammed paper or when inspecting the inside of the machine, do not allow necklaces, bracelets, or other metal objects to touch the inside of the machine, as this may result in burns or electrical shock. - If you tear the paper, remove any torn pieces to avoid further jams. - If loose toner comes into contact with your skin or clothing, wash with cold water. Warm water will set the toner. 5 Gently pull the jammed paper out of the machine. CAUTION - Do not pull the jammed paper forward from the paper cassette. It may cause a machine malfunction. - Do not pull the jammed paper upward. The toner on the paper will stain the machine and cause a permanent reduction in print quality. Troubleshooting 11-3
-
 1
1 -
2
-
3
-
4
-
5
-
6
-
7
-
8
-
9
-
10
-
11
-
12
-
13
-
14
-
15
-
16
-
17
-
18
-
19
-
20
-
21
-
22
-
23
-
24
-
25
-
26
-
27
-
28
-
29
-
30
-
31
-
32
-
33
-
34
-
35
-
36
-
37
-
38
-
39
-
40
-
41
-
42
-
43
-
44
-
45
-
46
-
47
-
48
-
49
-
50
-
51
-
52
-
53
-
54
-
55
-
56
-
57
-
58
-
59
-
60
-
61
-
62
-
63
-
64
-
65
-
66
-
67
-
68
-
69
-
70
-
71
-
72
-
73
-
74
-
75
-
76
-
77
-
78
-
79
-
80
-
81
-
82
-
83
-
84
-
85
-
86
-
87
-
88
-
89
-
90
-
91
-
92
-
93
-
94
-
95
-
96
-
97
-
98
-
99
-
100
-
101
-
102
-
103
-
104
-
105
-
106
-
107
-
108
-
109
-
110
-
111
-
112
-
113
-
114
-
115
-
116
-
117
-
118
-
119
-
120
-
121
-
 122
122 -
 123
123 -
 124
124 -
 125
125 -
 126
126 -
 127
127 -
 128
128 -
 129
129 -
 130
130 -
 131
131 -
 132
132 -
133
-
134
-
135
-
136
-
137
-
138
-
139
-
140
-
141
-
142
-
143
-
144
-
145
-
146
-
147
-
148
-
149
-
150
-
151
-
152
-
153
-
154
-
155
-
156
-
157
-
158
-
159
-
160
-
161
 |
 |