Canon imageCLASS MF4450 imageCLASS MF4570dn/MF4450 Starter Guide - Page 29
USB Connection, Checking the Installation Results - windows 7 driver
 |
View all Canon imageCLASS MF4450 manuals
Add to My Manuals
Save this manual to your list of manuals |
Page 29 highlights
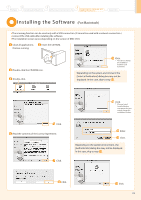
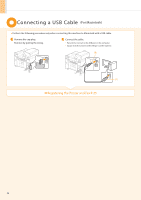
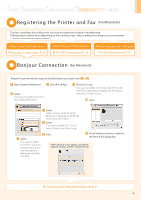
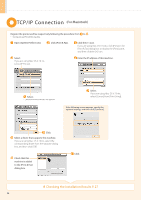
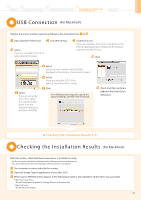
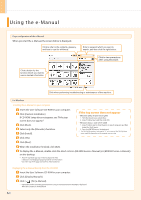
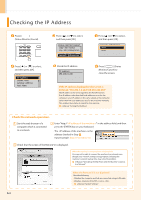
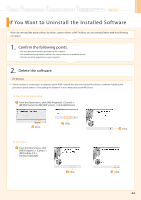
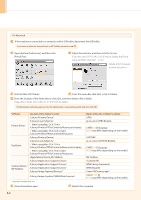
1 Preface 2 Installing the Machine 3 Configuring and Connecting the Fax 4 Connecting to a Computer and Installing the Drivers Appendix USB Connec tion (For Macintosh) Register the printer and fax respectively following the procedure from to . Open [System Preferences]. Click [Print & Fax]. Select. If you are using Mac OS X 10.4.x, select [Default Browser]. Click the [+] icon. If you are using Mac OS X 10.4.x, click [Print] in the [Print & Fax] dialog box to display the [Print] pane, and then click the [+] icon. Click. Select. If you are using Mac OS X 10.6.x, select the corresponding driver from the separate dialog box, and then click [OK]. Select. Select a printer name for which [USB] is displayed in the [Kind] or [Connection] column. Select. If you are using Mac OS X 10.4.x, select [Canon] from [Print Using]. Click. If the following screen appears, specify the optional settings, and then click [Continue]. Check that this machine is added to the [Print & Fax] dialog box. Checking the Installation Results P. 27 Check ing the Installation Results (For Macintosh) With this section, check that the scanner driver is installed correctly. • You do not need to check the installation results of the printer driver and fax driver. You can use the drivers when the registration of this machine is completed. The computer is connected with the scanner. Open the Image Capture application of your Mac OS X. When [Canon MF4500 Series] appears in the following locations, the installation of the driver was successful. •Mac OS X 10.4.x/10.5.x The pull-down menu displayed by clicking [Devices] in the menu bar. •Mac OS X 10.6.x The left list in the window 27
-
 1
1 -
2
-
3
-
4
-
5
-
6
-
7
-
8
-
9
-
10
-
11
-
12
-
13
-
14
-
15
-
16
-
17
-
18
-
19
-
20
-
21
-
22
-
23
-
 24
24 -
 25
25 -
 26
26 -
 27
27 -
 28
28 -
 29
29 -
 30
30 -
 31
31 -
 32
32 -
 33
33 -
 34
34 -
35
-
36
 |
 |