Canon imageCLASS MF4570dn imageCLASS MF4570dn Basic Operation Guide - Page 27
Back Side, Interior, Telephone line jack - usb cable
 |
View all Canon imageCLASS MF4570dn manuals
Add to My Manuals
Save this manual to your list of manuals |
Page 27 highlights
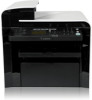
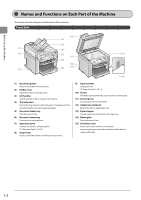
Before Using the Machine Back Side (1) (2) (3) (4) HSEATND EXT. (5) (6) HSEATND EXT. LINE LINE (7) (8) (1) Rating label The average values of the required voltage and current are specified. (2) Rear cover Open this cover to clear paper jams. (3) USB port Connect to a computer via a USB cable. (4) LAN port Connect to a network via a LAN cable. (5) Power switch Turn the power ON or OFF. (6) External device jack Connect an external telephone. (7) Telephone line jack Connect a telephone line. (8) Power socket Connect the power cord. Interior (1) (3) (2) (4) (5) (1) Scanning platform Open this platform to replace the toner cartridge or clear paper jams. (2) Toner cover Open this cover to replace the toner cartridge or clear paper jams. (3) Paper exit guide Open this guide to clear paper jams. (4) Toner guides When inserting the toner cartridge, fit the protrusions on the toner cartridge into these guides. (5) Transfer roller Transfers toner onto paper. 1-3
-
 1
1 -
2
-
3
-
4
-
5
-
6
-
7
-
8
-
9
-
10
-
11
-
12
-
13
-
14
-
15
-
16
-
17
-
18
-
19
-
20
-
21
-
 22
22 -
 23
23 -
 24
24 -
 25
25 -
 26
26 -
 27
27 -
 28
28 -
 29
29 -
 30
30 -
 31
31 -
 32
32 -
33
-
34
-
35
-
36
-
37
-
38
-
39
-
40
-
41
-
42
-
43
-
44
-
45
-
46
-
47
-
48
-
49
-
50
-
51
-
52
-
53
-
54
-
55
-
56
-
57
-
58
-
59
-
60
-
61
-
62
-
63
-
64
-
65
-
66
-
67
-
68
-
69
-
70
-
71
-
72
-
73
-
74
-
75
-
76
-
77
-
78
-
79
-
80
-
81
-
82
-
83
-
84
-
85
-
86
-
87
-
88
-
89
-
90
-
91
-
92
-
93
-
94
-
95
-
96
-
97
-
98
-
99
-
100
-
101
-
102
-
103
-
104
-
105
-
106
-
107
-
108
-
109
-
110
-
111
-
112
-
113
-
114
-
115
-
116
-
117
-
118
-
119
-
120
-
121
-
122
-
123
-
124
-
125
-
126
-
127
-
128
-
129
-
130
-
131
-
132
-
133
-
134
-
135
-
136
-
137
-
138
-
139
-
140
-
141
-
142
-
143
-
144
-
145
-
146
-
147
-
148
-
149
-
150
-
151
-
152
-
153
-
154
-
155
-
156
-
157
-
158
-
159
-
160
-
161
-
162
-
163
-
164
 |
 |
