Canon imageFORMULA P-150M Personal Document Scanner User Manual - Page 28
Color mode], Size], Dots per inch], Scanning Side], Deskew], Text orientation recognition]
 |
View all Canon imageFORMULA P-150M Personal Document Scanner manuals
Add to My Manuals
Save this manual to your list of manuals |
Page 28 highlights
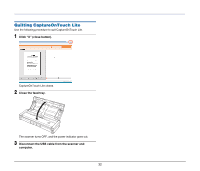
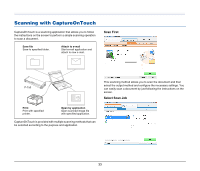
4 Set the scanning conditions. Click [Scanner setting], and set the scanning conditions in the dialog box that appears. [Default] Returns all settings to their default values. When you have finished configuring the settings, click [OK] to close the dialog box. Hint When splitting up multiple documents to scan in parts, select the [Enable continuous scanning] check box on the main screen. 5 Click [Start]. You can also press the start button on the scanner. [Color mode] Specify the mode (color, grayscale, or black-and-white binary) for scanning the document. To automatically detect whether the document is color or black-and-white, select [Auto Color Detection]. [Page Size] Specify the page size of documents. [Dots per inch] Specify the scanning resolution. [Scanning Side] Specify whether to scan one side or two sides. If [Skip blank page] is specified, blank pages within the document are skipped during scanning. [Deskew] Slanted scanned images are detected, and then straightened. [Text orientation recognition] The orientation of text in scanned images is detected, and the images are rotated so that the text is correctly oriented and then saved. [Adjust brightness] Adjust the brightness of scanned images. [Adjust contrast] Adjusts the contrast of scanned images. 28 Scanning of the document starts. When scanning of the whole document is completed, the output settings screen appears.
-
 1
1 -
2
-
3
-
4
-
5
-
6
-
7
-
8
-
9
-
10
-
11
-
12
-
13
-
14
-
15
-
16
-
17
-
18
-
19
-
20
-
21
-
22
-
 23
23 -
 24
24 -
 25
25 -
 26
26 -
 27
27 -
 28
28 -
 29
29 -
 30
30 -
 31
31 -
 32
32 -
 33
33 -
34
-
35
-
36
-
37
-
38
-
39
-
40
-
41
-
42
-
43
-
44
-
45
-
46
-
47
-
48
-
49
-
50
-
51
-
52
-
53
-
54
-
55
-
56
-
57
-
58
-
59
-
60
-
61
-
62
-
63
-
64
-
65
-
66
-
67
-
68
-
69
-
70
-
71
-
72
-
73
-
74
 |
 |
