Canon imagePROGRAF TX-3000 MFP T36 imagePROGRAF SS-41 / SS-31 / SS-21 Stacker - Page 8
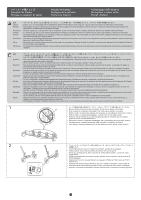
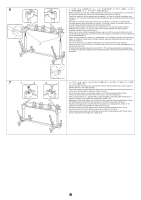
the position shown in the illustration.
 |
View all Canon imagePROGRAF TX-3000 MFP T36 manuals
Add to My Manuals
Save this manual to your list of manuals |
Page 8 highlights
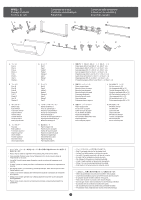
10 A B 11 A 12 B 13 C A B 3 A、B Spread out the basket cloth/rod 3 with the surface that the white tags (A and B) are attached to facing down. • Étalez le tissu du panier/la tige 3 avec la surface portant les étiquettes blanches (A et B) dirigée vers le bas. • Extienda la tela de la cesta/varilla 3 con la superficie a la que están conectadas las etiquetas blancas (A y B) hacia abajo. • Estique o tecido da cesta/haste 3 com a superfície que contém as marcas brancas (A e B) voltadas para baixo. • Breiten Sie das Korbtuch/Stange 3 mit der Oberfläche, an der die weißen Marken (A und B) befestigt sind, nach unten weisend aus. • Stendere il tessuto del raccoglitore/asta 3 con la superficie a cui sono attaccate le etichette bianche (A e B) rivolta verso il basso. • Spreid het opvangmanddoek/stang 3 uit met het oppervlak waar de witte labels (A en B) op zijn bevestigd, naar beneden. • Rozłóż materiał kosza/pręt 3 powierzchnią z białymi znacznikami (A i B) skierowaną w dół. 1 を、A Feed rod 1 through the tubular part where white tag A is attached. • Introduisez la tige 1 dans la parti tubulaire portant l'étiquette blanche A. • Inserte la varilla 1 a través de la parte tubular donde se conecta la etiqueta blanca A. • Passe a haste 1 pela parte tubular a que a marca branca A está afixada. • Führen Sie die Stange 1 durch den röhrenförmigen Teil, an dem die weiße Marke A befestigt ist. • Passare l'asta 1 attraverso la parte tubolare dove è attaccata l'etichetta bianca A. • Voer stang 1 door het buisvormige gedeelte waar het witte label A is bevestigd. • Wsuń pręt 1 do rurki z białym znacznikiem A. 2 を、B Feed rod 2 through the tubular part where white tag B is attached. • Introduisez la tige 2 dans la parti tubulaire portant l'étiquette blanche B. • Inserte la varilla 2 a través de la parte tubular donde se conecta la etiqueta blanca B. • Passe a haste 2 pela parte tubular a que a marca branca B está afixada. • Führen Sie die Stange 2 durch den röhrenförmigen Teil, an dem die weiße Marke B befestigt ist. • Passare l'asta 2 attraverso la parte tubolare dove è attaccata l'etichetta bianca B. • Voer stang 2 door het buisvormige gedeelte waar het witte label B is bevestigd. • Wsuń pręt 2 do rurki z białym znacznikiem B. A B 1 C • Insert the tips (B) of the arm into both ends (C) of rod 1 such that the white tag (A) is oriented in the position shown in the illustration. • Insérez les extrémités (B) du bras dans les deux extrémités (C) de la tige 1, de telle manière que l'étiquette blanche (A) soit orientée dans la position indiquée sur l'illustration. • Inserte las puntas (B) del brazo en ambos extremos (C) de la varilla 1 de manera tal que la etiqueta blanca (A) esté orientada en la posición que se observa en la ilustración. • Insira as pontas (B) do braço nas duas extremidades (C) da haste 1 de forma que a marca branca (A) esteja orientada na posição exibida na ilustração. • Führen Sie die Spitzen (B) des Arms in beide Enden (C) der Stange 1 so ein, dass die weiße Marke (A) in der Position ausgerichtet ist, die in der Abbildung dargestellt ist. • Inserire le punte (B) del braccio in entrambe le estremità (C) dell'asta 1 in modo che l'etichetta bianca (A) sia orientata nella posizione mostrata nella figura. • Steek de punten (B) van de arm in beide uiteinden (C) van stang 1, zo dat het witte label (A) is gericht naar de positie die in de illustratie wordt getoond. • Wsuń końcówki (B) ramienia w oba końce (C) pręta 1, tak aby biały znacznik (A) znajdował się w położeniu przedstawionym na rysunku. 7
-
 1
1 -
2
-
 3
3 -
 4
4 -
 5
5 -
 6
6 -
 7
7 -
 8
8 -
 9
9 -
 10
10 -
 11
11 -
 12
12 -
 13
13 -
14
 |
 |
