Canon imagePROGRAF TX-3000 MFP T36 imagePROGRAF SS-41 / SS-31 / SS-21 Stacker - Page 9
Befestigen Sie beide Enden der Stange 1 mit den M4-Sechskantschrauben. Ziehen Sie die
 |
View all Canon imagePROGRAF TX-3000 MFP T36 manuals
Add to My Manuals
Save this manual to your list of manuals |
Page 9 highlights
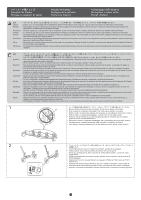
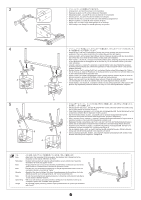
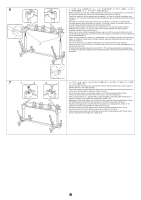
14 15 B A 16 A 1 M4 M4 • Affix both ends of rod 1 using M4 hex screws. Securely tighten the screws using the M4 Allen wrench. • Fixez les deux extrémités de la tige 1 à l'aide des vis hexagonales M4. Serrez fermement les vis à l'aide de la Clé Allen M4. • Fije ambos extremos de la varilla 1 con tornillos hexagonales M4. Apriete bien los tornillos con la llave Allen M4. • Prenda as duas extremidades da haste 1 usando parafusos sextavados M4. Aperte bem os parafusos usando a chave allen M4. • Befestigen Sie beide Enden der Stange 1 mit den M4-Sechskantschrauben. Ziehen Sie die Schrauben mit dem M4-Inbus-Schlüssel fest an. • Fissare entrambe le estremità dell'asta 1 utilizzando le viti esagonali M4. Serrare saldamente le viti utilizzando la chiave a brugola M4. • Bevestig beide uiteinden van stang 1 met de M4 zeskantschroeven. Zet de schroeven stevig vast met de M4-inbussleutel. • Zamocuj oba końce pręta 1 śrubami sześciokątnymi M4. Dokręć śruby kluczem imbusowym M4. 2(A B Place rod 2 (A) such that it hooks onto the left and right arms of the B parts. • Placez la tige 2 (A) de telle manière qu'elle s'accroche sur les bras gauche et droit des parties B. • Coloque la varilla 2 (A) de manera tal que se enganche en los brazos izquierdo y derecho de las partes B. • Posicione a haste 2 (A) de forma que ela enganche nos braços direito e esquerdo das peças B. • Platzieren Sie die Stange 2 (A) so, dass sie an dem linken und rechten Arm der Teile B eingehängt ist. • Posizionare l'asta 2 (A) in modo che si agganci ai bracci sinistro e destro delle parti B. • Plaats stang 2 (A) zo dat deze vast komt te zitten aan de linker en rechter arm van de onderdelen B. • Umieść pręt 2 (A) tak, aby zaczepił się o lewe i prawe ramię części B. B A 3 A • Insert and attach rod 3 which was originally attached to the basket cloth into the grooves (A) in the front of the paper stopper rod. • Insérez et montez la tige 3, qui était à l'origine montée sur le tissu du panier, dans les rainures (A) à l'avant de la tige du butoir du papier. • Inserte y conecte la varilla 3 que originalmente se conectó a la tela de la cesta en las ranuras (A) que están delante de la varilla del tope de papel. • Insira e afixe a haste 3, que foi originalmente afixada ao tecido da cesta, nos sulcos (A) na parte dianteira da haste do fixador de papel. • Befestigen Sie die Stange 3, die ursprünglich am Korbtuch befestigt war, indem Sie sie in die Nuten (A) vor der Papieranschlagstange einführen. • Inserire e fissare l'asta 3 originariamente montata nel tessuto del raccoglitore nelle scanalature (A), davanti all'asta dell'arresto carta. • Plaats en bevestig stang 3 die oorspronkelijk aan het opvangmanddoek was bevestigd, in de A groeven (A) in de voorzijde van de papierstopstang. • Wsuń i zamocuj pręt 3, który pierwotnie był dołączony do materiału kosza, w rowkach (A) przed prętem stopera papieru. メモ Note Remarque Nota Nota Hinweis Nota Opmerking Uwaga P.6 If you attach it incorrectly, remove by using the same method as the paper stopper rod (refer to p.6). • Si vous la montez de manière incorrecte, ôtez-la selon la même méthode que la tige du butoir du papier (reportez-vous à la p. 6). • Si la conecta incorrectamente, retírela aplicando el mismo método que para la varilla del tope de papel (consulte la página 6). • Caso afixá-la incorretamente, remova-a usando o mesmo método usado para a haste do fixador de papel (consulte a p. 6). • Wenn Sie sie falsch befestigen, entfernen Sie sie mit derselben Methode wie bei der Papieranschlagstange (siehe S. 6). • Se si fissa male il componente, rimuoverlo con lo stesso metodo dell'asta dell'arresto carta (vedere pag. 6). • Heeft u de stang niet goed bevestigd, verwijder deze dan volgens dezelfde methode als bij de papierstopstang (raadpleeg pag. 6). • W przypadku nieprawidłowego zamocowania odłącz go, korzystając z tej samej metody, co w przypadku pręta stopera papieru (patrz str. 6). 17 A A • Check the condition of the top stay. If the movable part of the top stay is tilted over, stand it up by lifting up the A part. • Vérifiez l'état de l'étai supérieur. Si la partie mobile de l'étai supérieur est penchée, redressez-la en soulevant la partie A. • Revise la condición del travesaño superior. Si la parte móvil del travesaño superior está inclinada, párela levantando la parte A. • Verifique a condição do suporte superior. Se a parte móvel do suporte superior estiver inclinada, levante-a elevando a parte A. • Überprüfen Sie den Zustand der oberen Stütze. Wenn der bewegliche Teil der oberen Stütze umgekippt ist, richten Sie ihn auf, indem Sie den Teil A anheben. • Controllare la condizione del tirante superiore. Se la parte semovente del tirante superiore è troppo inclinato, rimetterla in posizione eretta sollevando la parte A. • Controleer de staat van de bovenste steun. Als het beweegbare deel van de bovenste steun is gekanteld, zet het dan overeind door onderdeel A op te tillen. • Sprawdź stan górnej poprzeczki. Jeżeli ruchoma część górnej poprzeczki przechyliła się, podnieś ją, podnosząc część A. 8
-
 1
1 -
2
-
3
-
 4
4 -
 5
5 -
 6
6 -
 7
7 -
 8
8 -
 9
9 -
 10
10 -
 11
11 -
 12
12 -
 13
13 -
 14
14
 |
 |
