Canon imagePROGRAF W7200 User Guide - Page 115
the left end of the carriage rail., With the black sponge surface on the rail
 |
View all Canon imagePROGRAF W7200 manuals
Add to My Manuals
Save this manual to your list of manuals |
Page 115 highlights
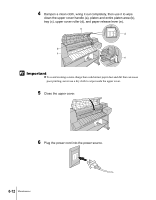
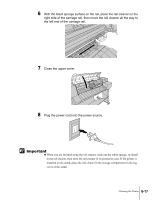
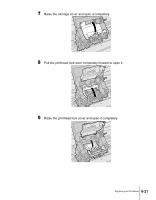
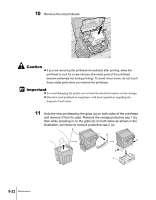
6 With the black sponge surface on the rail, place the rail cleaner on the right side of the carriage rail, then move the rail cleaner all the way to the left end of the carriage rail. 7 Close the upper cover. 8 Plug the power cord into the power source. Important z When you are finished using the rail cleaner, wash out the white sponge, re-install in the rail cleaner, then store the rail cleaner in its protective case. If the printer is installed on the stand, place the rail cleaner in the storage compartment in the leg cover of the stand. Cleaning the Printer 6-17
-
 1
1 -
2
-
3
-
4
-
5
-
6
-
7
-
8
-
9
-
10
-
11
-
12
-
13
-
14
-
15
-
16
-
17
-
18
-
19
-
20
-
21
-
22
-
23
-
24
-
25
-
26
-
27
-
28
-
29
-
30
-
31
-
32
-
33
-
34
-
35
-
36
-
37
-
38
-
39
-
40
-
41
-
42
-
43
-
44
-
45
-
46
-
47
-
48
-
49
-
50
-
51
-
52
-
53
-
54
-
55
-
56
-
57
-
58
-
59
-
60
-
61
-
62
-
63
-
64
-
65
-
66
-
67
-
68
-
69
-
70
-
71
-
72
-
73
-
74
-
75
-
76
-
77
-
78
-
79
-
80
-
81
-
82
-
83
-
84
-
85
-
86
-
87
-
88
-
89
-
90
-
91
-
92
-
93
-
94
-
95
-
96
-
97
-
98
-
99
-
100
-
101
-
102
-
103
-
104
-
105
-
106
-
107
-
108
-
109
-
 110
110 -
 111
111 -
 112
112 -
 113
113 -
 114
114 -
 115
115 -
 116
116 -
 117
117 -
 118
118 -
 119
119 -
 120
120 -
121
-
122
-
123
-
124
-
125
-
126
-
127
-
128
-
129
-
130
-
131
-
132
-
133
-
134
-
135
-
136
-
137
-
138
-
139
-
140
-
141
-
142
-
143
-
144
-
145
-
146
-
147
-
148
-
149
-
150
-
151
-
152
-
153
-
154
-
155
-
156
-
157
-
158
-
159
-
160
-
161
-
162
-
163
-
164
-
165
-
166
-
167
-
168
-
169
-
170
-
171
-
172
-
173
-
174
-
175
-
176
-
177
-
178
-
179
-
180
-
181
-
182
-
183
-
184
-
185
-
186
-
187
 |
 |

Cleaning the Printer
6-17
Important
6
With the black sponge surface on the rail, place the rail cleaner on the
right side of the carriage rail, then move the rail cleaner all the way to
the left end of the carriage rail.
7
Close the upper cover.
8
Plug the power cord into the power source.
z
When you are finished using the rail cleaner, wash out the white sponge, re-install
in the rail cleaner, then store the rail cleaner in its protective case. If the printer is
installed on the stand, place the rail cleaner in the storage compartment in the leg
cover of the stand.