Casio EX Z40 Owners Manual - Page 160
Trash. After pressing the USB cradle's [USB], Macintosh hard disk, drag the DCIM folder
 |
UPC - 079767683566
View all Casio EX Z40 manuals
Add to My Manuals
Save this manual to your list of manuals |
Page 160 highlights
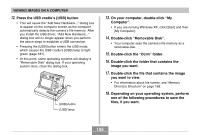
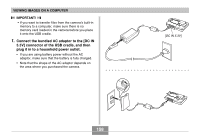
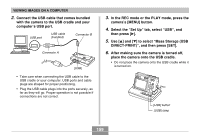
VIEWING IMAGES ON A COMPUTER 7. Press the USB cradle's [USB] button. • Pressing the [USB] button enters the USB mode, which causes the USB cradle's [USB] lamp to light green (page 187). 8. Your Macintosh will see the camera's file memory as a drive. • The appearance of the drive icon depends on the Mac OS version you are using. • After installing the USB driver, your Macintosh will see the camera's file memory as a drive whenever you establish a USB connection between them. 9. Double-click the drive icon for the camera's file memory, the "DCIM" folder, and then the folder that contains the image you want. 10. Double-click the file that contains the image you want to view. • For information about file names, see "Memory Directory Structure" on page 163. 11. To copy all the files in file memory to your Macintosh hard disk, drag the "DCIM" folder to the folder to which you want to copy it. IMPORTANT! • Never use your computer to edit, delete, move, or rename images stored in file memory. Doing so can cause problems with the image management data used by the camera, which may make it impossible to display images on the camera or it may cause a large error in the number of images value displayed by the camera. Always copy images to your computer memory before performing any edit, delete, move, or rename operation. 12. To terminate the USB connection, drag the drive icon that represents the camera to Trash. After pressing the USB cradle's [USB] button and making sure that the [USB] lamp is not lit, remove the camera from the USB cradle. 160
-
 1
1 -
2
-
3
-
4
-
5
-
6
-
7
-
8
-
9
-
10
-
11
-
12
-
13
-
14
-
15
-
16
-
17
-
18
-
19
-
20
-
21
-
22
-
23
-
24
-
25
-
26
-
27
-
28
-
29
-
30
-
31
-
32
-
33
-
34
-
35
-
36
-
37
-
38
-
39
-
40
-
41
-
42
-
43
-
44
-
45
-
46
-
47
-
48
-
49
-
50
-
51
-
52
-
53
-
54
-
55
-
56
-
57
-
58
-
59
-
60
-
61
-
62
-
63
-
64
-
65
-
66
-
67
-
68
-
69
-
70
-
71
-
72
-
73
-
74
-
75
-
76
-
77
-
78
-
79
-
80
-
81
-
82
-
83
-
84
-
85
-
86
-
87
-
88
-
89
-
90
-
91
-
92
-
93
-
94
-
95
-
96
-
97
-
98
-
99
-
100
-
101
-
102
-
103
-
104
-
105
-
106
-
107
-
108
-
109
-
110
-
111
-
112
-
113
-
114
-
115
-
116
-
117
-
118
-
119
-
120
-
121
-
122
-
123
-
124
-
125
-
126
-
127
-
128
-
129
-
130
-
131
-
132
-
133
-
134
-
135
-
136
-
137
-
138
-
139
-
140
-
141
-
142
-
143
-
144
-
145
-
146
-
147
-
148
-
149
-
150
-
151
-
152
-
153
-
154
-
 155
155 -
 156
156 -
 157
157 -
 158
158 -
 159
159 -
 160
160 -
 161
161 -
 162
162 -
 163
163 -
 164
164 -
 165
165 -
166
-
167
-
168
-
169
-
170
-
171
-
172
-
173
-
174
-
175
-
176
-
177
-
178
-
179
-
180
-
181
-
182
-
183
-
184
-
185
-
186
-
187
-
188
-
189
-
190
-
191
-
192
-
193
-
194
-
195
-
196
-
197
-
198
 |
 |