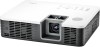
Casio XJ-H1750 Wireless Guide - Page 10
Installing Wireless Connection 3, Installing Wireless Connection 3 on a Second and Subsequent
 |
View all Casio XJ-H1750 manuals
Add to My Manuals
Save this manual to your list of manuals |
Page 10 highlights
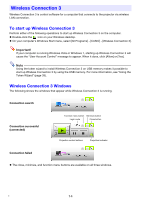
Installing Wireless Connection 3 1. Place the CD-ROM that comes with the projector into your computer's CD-ROM drive. z This will automatically display the CD-ROM menu screen. 2. On the menu screen, click the [Install] button to the right of "Wireless Connection 3". z Follow the instructions on the dialog boxes that appear on the screen. z If you are running Windows 7 and the "User Account Control" message appears while installing, click [Yes]. z If you are running Windows Vista and the "User Account Control" message appears while installing, click [Allow]. z If you are running Windows XP and the message shown below appears while installing, click [Continue Anyway]. Note After you install Wireless Connection 3, it will start up automatically and start searching for a projector. If you want to establish a wireless LAN connection between the computer and projector at that time, perform the procedure under "To use a default SSID to connect a computer to the projector via wireless LAN" (page 15). If you do not want to establish a connection, click the close button in the upper right corner of the Wireless Connection 3 window. Installing Wireless Connection 3 on a Second and Subsequent Computers You can use the Wireless Connection 3 token wizard to install Wireless Connection 3 on USB memory. Then you can plug the USB memory to the USB port of any computer and start up Wireless Connection 3 from there. This means it is not necessary to install Wireless Connection 3 from the CD-ROM on each computer that will connect with the projector over the wireless LAN. For more information, see "Using the Token Wizard" (page 39). 10
-
 1
1 -
2
-
3
-
4
-
 5
5 -
 6
6 -
 7
7 -
 8
8 -
 9
9 -
 10
10 -
 11
11 -
 12
12 -
 13
13 -
 14
14 -
 15
15 -
16
-
17
-
18
-
19
-
20
-
21
-
22
-
23
-
24
-
25
-
26
-
27
-
28
-
29
-
30
-
31
-
32
-
33
-
34
-
35
-
36
-
37
-
38
-
39
-
40
-
41
-
42
-
43
-
44
-
45
-
46
-
47
 |
 |
