Casio XJ-H2600 User Manual - Page 51
Troubleshooting, Indicators, Error Indicators and Warning Messages
 |
View all Casio XJ-H2600 manuals
Add to My Manuals
Save this manual to your list of manuals |
Page 51 highlights
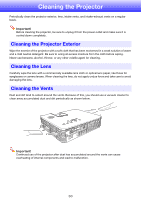
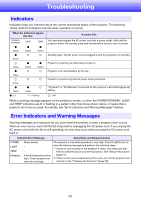
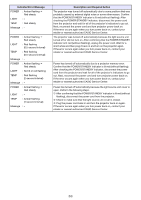
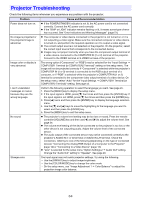
Troubleshooting Indicators Indicators keep you informed about the current operational status of the projector. The following shows what the indicators look like when operation is normal. When the indicators appear like this: POWER/ STANDBY LIGHT TEMP z Amber z Amber z Amber c z Amber c Green z Green Amber z Green z Amber c c z Green z Amber c c c z : Lit : Flashing It means this: You have just plugged the AC power cord into a power outlet. Wait until the projector enters the standby state (see below) before trying to turn on power. Standby state: The AC power cord is plugged in and the projector is in standby. Projector is warming up after being turned on. Projector is on and standing by for use. Projector is performing internal power down processes. "On (Auto)" or "On (Manual)" is selected for the projector's Eco Mode (page 25) setting. c : Unlit When a warning message appears on the projection screen, or when the POWER/STANDBY, LIGHT, and TEMP indicators are lit or flashing in a pattern other than those shown above, it means that a projector error has occurred. For details, see "Error Indicators and Warning Messages" (below). Error Indicators and Warning Messages Warning messages and indicators let you know what the problem is when a projector error occurs. When an error occurs, wait until the fan stops before unplugging the AC power cord. If you unplug the AC power cord while the fan is still operating, an error may occur when you plug the AC power cord back in. Indicator/Error Message Description and Required Action POWER LIGHT TEMP Message : Green steady :- :- : Internal temperature is too high. Check projector air vents for blockage. The projector's internal temperature is very high. Press the [ESC] key to clear the warning message and perform the following steps. 1 Check for any blocking of the projector's vents, and make sure that there is sufficient space around the projector. See "Setup Precautions" (page 11). 2 If there is dust accumulated around the vents, turn off the projector and remove it. See "Cleaning the Projector" (page 50). 51
-
 1
1 -
2
-
3
-
4
-
5
-
6
-
7
-
8
-
9
-
10
-
11
-
12
-
13
-
14
-
15
-
16
-
17
-
18
-
19
-
20
-
21
-
22
-
23
-
24
-
25
-
26
-
27
-
28
-
29
-
30
-
31
-
32
-
33
-
34
-
35
-
36
-
37
-
38
-
39
-
40
-
41
-
42
-
43
-
44
-
45
-
 46
46 -
 47
47 -
 48
48 -
 49
49 -
 50
50 -
 51
51 -
 52
52 -
 53
53 -
 54
54 -
 55
55 -
 56
56 -
57
-
58
-
59
-
60
-
61
-
62
-
63
-
64
-
65
-
66
-
67
-
68
-
69
-
70
-
71
-
72
-
73
-
74
 |
 |
