Celestron CGEM DX Mount and Tripod Computerized Telescope CGEM DX Mount Manual - Page 10
One Star Align, Solar, System Align, Quick-Align, Last Alignment, Updating Your Location
 |
View all Celestron CGEM DX Mount and Tripod Computerized Telescope manuals
Add to My Manuals
Save this manual to your list of manuals |
Page 10 highlights
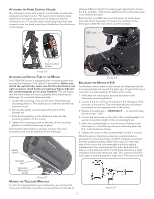
Two Star Align uses the entered time/location information and allows the user to select which two alignment stars the telescope will automatically slew to. One Star Align uses the same time/ location information but only uses one star for alignment. Solar System Align will display a list of visible daytime objects (planets and the moon) available to align the telescope. Quick-Align will ask you to input all the same information as you would for the Auto Align procedure. However, instead of slewing to the alignment stars for centering and alignment, the telescope bypasses this step and simply models the sky based on the information given. Finally, Last Alignment restores your last saved star alignment and switch position. Last Alignment also serves as a good safeguard in case the telescope should lose power. Startup Procedure Before any of the described alignments are performed, the telescope mount needs to be positioned so that the index marks are aligned on both the right ascension and declination axes. (see Fig 3-2). Once the index position has been set, the hand control will display the last entered date and time information stored in the hand control. Index Marks allow you to select the closest city to your observing site from a list of either international or U.S. location. Custom Site allows you to enter the exact longitude and latitude of your observing site. Select City Database and press ENTER. • The hand control will allow you to choose from either U.S. or international locations. For a listing of U.S. locations by state and then by city, press ENTER while United States is displayed. For international locations, use the Up or Down scroll key to select International and press ENTER. • Use the Up and Down Scroll buttons to choose your current state (or country if International locations was selected) from the alphabetical listing and press ENTER. • Use the Up and Down Scroll buttons to choose the closest city to your location from the displayed list and press ENTER. Time - Enter the current local time for your area. You can enter either the local time (i.e. 08:00), or you can enter military time (i.e. 20:00 ). • Select PM or AM. If military time was entered, the hand control will bypass this step. • Choose between Standard time or Daylight Savings time. Use the Up and Down scroll buttons (10) to toggle between options. • Select the time zone that you are observing from. Again, use the Up and Down buttons (10) to scroll through the choices. Refer to Time Zone map in Appendix for more information. Date - Enter the month, day and year of your observing session. Figure 3-2 - Declination Index Marks and Right Ascension (RA) Index Marks 1. Press ENTER to begin the alignment process. 2. The hand control will ask the user to set the mount to its index position. Move the telescope mount, either manually or with the hand control, so that the index marked in both R.A. and Dec are aligned (see Fig 3-2). Press Enter to continue. • The hand control will then display the last entered local time, time zone and date. • Use the Up/Down keys (10) to view the current parameters. • Press ENTER to accept the current parameters. • Press UNDO to enter current date, time and location information into the hand control. The following information will be displayed: Location - The hand control will display a list of cities to choose from. Choose the city from the database that is closest to your current observing site. The city you choose will be remembered in the hand controls memory so that it will be automatically displayed the next time an alignment is done. Alternatively, if you know the exact longitude and latitude of your observing site, it can be entered directly into the hand control and remembered for future use as well. To choose a location city: • Use the Up and Down scroll keys to choose between City Database and Custom Site. City Database will Updating Your Location - Since you may not need to update your observing location as often as the date and time, it is not displayed each time you update the date and time. To update your city, press UNDO at any time when updating your date and time. Continue to press UNDO to change the state, country or to add longitude/ latitude coordinates. Select one of the alignment methods as described below. Note: If incorrect information is entered into the hand control, the UNDO button acts like a back space button allowing the user to re-enter the correct data. Two Star Align Two-Star Align allows the user to select two stars on which to align the telescope. To align your telescope using the Two-Star Align method: 1. Select Two-Star Align from the alignment choices given. Based on the date and time information entered, the hand control will automatically select and display a bright star that is above the horizon. • Press ENTER to select this star as your first alignment star. • If for some reason the chosen star is not visible (perhaps behind a tree or building) press UNDO to have the hand control automatically select the next brightest star. • Or you can use the Up/Down keys to browse the entire Named Star list and select any one of over two hundred alignment stars. 8
-
 1
1 -
2
-
3
-
4
-
 5
5 -
 6
6 -
 7
7 -
 8
8 -
 9
9 -
 10
10 -
 11
11 -
 12
12 -
 13
13 -
 14
14 -
 15
15 -
16
-
17
-
18
-
19
-
20
-
21
-
22
-
23
-
24
-
25
-
26
-
27
-
28
-
29
-
30
-
31
-
32
-
33
-
34
-
35
-
36
-
37
-
38
 |
 |
