Celestron CGEM DX Mount and Tripod Computerized Telescope CGEM DX Mount Manual - Page 7
Hand Control - cgem dx mount & tripod computerized telescope
 |
View all Celestron CGEM DX Mount and Tripod Computerized Telescope manuals
Add to My Manuals
Save this manual to your list of manuals |
Page 7 highlights
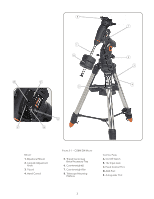
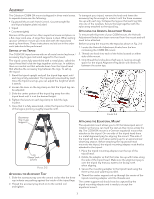
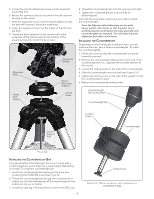
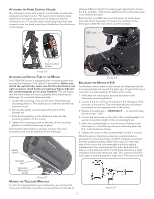
Attaching the Hand Control Holder The telescope comes with a hand control holder to place the computerized hand control. The hand control holder comes attached to the tripod leg and can be easily removed for convenient use. To use the hand control plug the phone jack connector into the hand control port labeled on the electronics control panel. observe different objects. To make rough adjustments, loosen the R.A. and DEC clutch knobs slightly and move the telescope in the desired direction. Both the R.A. and DEC axis have lock levers to clutch down each axis of the telescope. To loosen the clutches on the telescope, rotate the lock levers counterclockwise. DEC Lock RA Lock Hand Control Holder Figure 2-6 Attaching an Optical Tube to the Mount The CGEM DX mount is equipped with a mounting plate that accepts the Celestron CGE style (3") dovetail bar. Before you attach the optical tube, make sure that the declination and right ascension clutch knobs are tight (see Figure 2-8) and the counterweight(s) are securely installed. This will ensure that the mount does not move suddenly while attaching the telescope. To mount the telescope tube: 1. Loosen the mounting screw on the side of the telescope mounting platform. This allows you to slide the dovetail bar onto the mount. 2. Remove the safety screw located at the front of the dovetail bar. 3. Slide the dovetail bar on the telescope tube into the mounting platform of the mount. 4. Tighten the mounting screw on the side of the mounting platform to hold the telescope in place. Now that the optical tube is securely in place, the visual accessories can now be attached to the telescope. Safety Screw Figure 2-8 Balancing the Mount in R.A. To eliminate undue stress on the mount, the telescope should be properly balanced around the polar axis. Proper balancing is crucial for accurate tracking. To balance the mount: 1. Verify that the telescope is securely attached to the telescope mounting platform. 2. Loosen the R.A. lock lever and position the telescope off to one side of the mount. The counterweight bar will extend horizontally on the opposite side of the mount. 3. Release the telescope - GRADUALLY - to see which way the telescope "rolls." 4. Loosen the set screws on the side of the counterweight so it can be moved the length of the counterweight bar. 5. Move the counterweight to a point where it balances the telescope (i.e., the telescope remains stationary when the R.A. clutch knobs are loose). 6. Tighten the screw on the counterweight to hold it in place. While the above instructions describe a perfect balance arrangement, there should be a SLIGHT imbalance to ensure the best possible tracking. When the scope is on the west side of the mount the counterweight should be slightly imbalanced to the counterweight bar side. And when the tube is on the east side of the mount there should be a slight imbalance toward the telescope side. This is done so that the worm gear is pushing against a slight load. The amount of the Dovetail Bar Telescope Mounting Screw Figure 2-7 Moving the Telescope Manually In order to properly balance your telescope, you will need to move your telescope manually at various portions of the sky to Figure 2-9 5
-
 1
1 -
 2
2 -
 3
3 -
 4
4 -
 5
5 -
 6
6 -
 7
7 -
 8
8 -
 9
9 -
 10
10 -
 11
11 -
 12
12 -
13
-
14
-
15
-
16
-
17
-
18
-
19
-
20
-
21
-
22
-
23
-
24
-
25
-
26
-
27
-
28
-
29
-
30
-
31
-
32
-
33
-
34
-
35
-
36
-
37
-
38
 |
 |
