Celestron Micro 360 Microscope with 2 MP Imager Digital Microscope Imager Manu - Page 3
Setting Up Your Digital, Microscope Imager
 |
View all Celestron Micro 360 Microscope with 2 MP Imager manuals
Add to My Manuals
Save this manual to your list of manuals |
Page 3 highlights
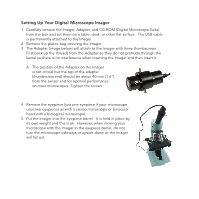
Setting Up Your Digital Microscope Imager 1. Carefully remove the Imager, Adapter, and CD-ROM (Digital Microscope Suite) from the box and set them on a table, desk, or other flat surface. The USB cable is permanently attached to the Imager. 2. Remove the plastic bag covering the Imager. 3. The Adapter (image below) will attach to the Imager with three thumbscrews. First back up the threads from the Adapter so they do not protrude through the barrel so there is no interference when inserting the Imager and then insert it. A. The position of the Adapter on the Imager is not critical but the top of the adapter (thumbscrew end) should be about 40 mm (1.6") from the sensor end for optimal performance on most microscopes. Tighten the screws. 4. Remove the eyepiece (just one eyepiece if your microscope uses two eyepieces as with a stereo microscope or binocular head with a biological microscope). 5. Put the Imager into the eyepiece barrel. It is held in place by its own weight and this is ok. However, when moving your microscope with the Imager in the eyepiece barrel, do not turn the microscope sideways or upside down or the Imager will fall out.
-
 1
1 -
 2
2 -
 3
3 -
 4
4 -
 5
5 -
 6
6 -
 7
7 -
 8
8 -
 9
9 -
10
-
11
-
12
-
13
-
14
-
15
-
16
-
17
-
18
-
19
-
20
-
21
-
22
-
23
-
24
-
25
-
26
-
27
-
28
-
29
-
30
-
31
-
32
-
33
-
34
-
35
-
36
-
37
-
38
-
39
-
40
 |
 |
