Cisco 5580-40 Hardware Installation Guide - Page 32
Warning, Step 1, Chassis Side Rail Attachment
 |
View all Cisco 5580-40 manuals
Add to My Manuals
Save this manual to your list of manuals |
Page 32 highlights
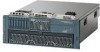
Rack-Mounting the Chassis Chapter 3 Installing the ASA 5580 Warning To prevent bodily injury when mounting or servicing this unit in a rack, you must take special precautions to ensure that the system remains stable. The following guidelines are provided to ensure your safety: This unit should be mounted at the bottom of the rack if it is the only unit in the rack. When mounting this unit in a partially filled rack, load the rack from the bottom to the top with the heaviest component at the bottom of the rack. If the rack is provided with stabilizing devices, install the stabilizers before mounting or servicing the unit in the rack. Statement 1006 This procedure requires two or more people to position the ASA 5580 on the slide assemblies before pushing it in to the rack. To install the ASA 5580 in the rack, perform the following steps: Step 1 Attach the chassis side rail to the ASA 5580 by aligning the chassis rail to the stud on the ASA 5580, pressing the chassis side rail in to the stud, and then sliding the chassis side rail backwards until you hear the latch catch, as shown in Figure 3-1. Figure 3-1 Chassis Side Rail Attachment 1 2 3 4 5 6 7 8 CiscoIInPtSru4s2io7n0 SERIES Prevention Sensor UID SYSTEPMWR SMTGATMUTMS0GMT 1 201990 Note The tapered end of the chassis side rail should be at the back of the ASA 5580. The chassis side rail is held in place by the inner latch. Step 2 Repeat Step 1 for each chassis side rail. Step 3 To remove the chassis side rail, lift the latch, and slide the rail forward, as shown in Figure 3-2. Cisco ASA 5580 Series Adaptive Security Appliance Hardware Installation Guide 3-2 OL-12920-01
-
 1
1 -
2
-
3
-
4
-
5
-
6
-
7
-
8
-
9
-
10
-
11
-
12
-
13
-
14
-
15
-
16
-
17
-
18
-
19
-
20
-
21
-
22
-
23
-
24
-
25
-
26
-
 27
27 -
 28
28 -
 29
29 -
 30
30 -
 31
31 -
 32
32 -
 33
33 -
 34
34 -
 35
35 -
 36
36 -
 37
37 -
38
-
39
-
40
-
41
-
42
-
43
-
44
-
45
-
46
-
47
-
48
-
49
-
50
-
51
-
52
-
53
-
54
-
55
-
56
-
57
-
58
-
59
-
60
-
61
-
62
-
63
-
64
-
65
-
66
-
67
-
68
-
69
-
70
-
71
-
72
-
73
-
74
-
75
-
76
-
77
-
78
-
79
-
80
-
81
-
82
-
83
-
84
 |
 |
