Cisco 7604 Installation Guide - Page 130
Step 1, Step 2, Step 3, Step 4, Caution, Step 5, Step 6, Step 7
 |
View all Cisco 7604 manuals
Add to My Manuals
Save this manual to your list of manuals |
Page 130 highlights
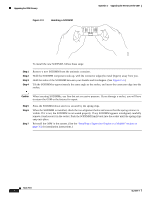
Upgrading the OSM Memory Figure C-3 Handling a SODIMM Appendix C Upgrading the Memory on the OSM 33115 To install the new SODIMM, follow these steps: Step 1 Step 2 Step 3 Step 4 Remove a new SODIMM from the antistatic container. Hold the SODIMM component-side-up, with the connector edge (the metal fingers) away from you. Hold the sides of the SODIMM between your thumbs and forefingers. (See Figure C-3.) Tilt the SODIMM to approximately the same angle as the socket, and insert the connector edge into the socket. Caution When inserting SODIMMs, use firm but not excessive pressure. If you damage a socket, you will have to return the OSM to the factory for repair. Step 5 Step 6 Step 7 Press the SODIMM down until it is secured by the spring clips. When the SODIMM is installed, check the two alignment holes and ensure that the spring retainer is visible. If it is not, the SODIMM is not seated properly. If any SODIMM appears misaligned, carefully remove it and reseat it in the socket. Push the SODIMM firmly back into the socket until the spring clips snap into place. Reinstall the OSM in the system. (See the "Installing a Supervisor Engine or a Module" section on page 3-2 for installation instructions.) Book Title C-6 OL-5077-7
-
 1
1 -
2
-
3
-
4
-
5
-
6
-
7
-
8
-
9
-
10
-
11
-
12
-
13
-
14
-
15
-
16
-
17
-
18
-
19
-
20
-
21
-
22
-
23
-
24
-
25
-
26
-
27
-
28
-
29
-
30
-
31
-
32
-
33
-
34
-
35
-
36
-
37
-
38
-
39
-
40
-
41
-
42
-
43
-
44
-
45
-
46
-
47
-
48
-
49
-
50
-
51
-
52
-
53
-
54
-
55
-
56
-
57
-
58
-
59
-
60
-
61
-
62
-
63
-
64
-
65
-
66
-
67
-
68
-
69
-
70
-
71
-
72
-
73
-
74
-
75
-
76
-
77
-
78
-
79
-
80
-
81
-
82
-
83
-
84
-
85
-
86
-
87
-
88
-
89
-
90
-
91
-
92
-
93
-
94
-
95
-
96
-
97
-
98
-
99
-
100
-
101
-
102
-
103
-
104
-
105
-
106
-
107
-
108
-
109
-
110
-
111
-
112
-
113
-
114
-
115
-
116
-
117
-
118
-
119
-
120
-
121
-
122
-
123
-
124
-
 125
125 -
 126
126 -
 127
127 -
 128
128 -
 129
129 -
 130
130 -
 131
131 -
 132
132 -
 133
133 -
 134
134 -
 135
135 -
136
-
137
-
138
 |
 |
