Cisco 7960 User Guide - Page 28
Indicates your Cisco IP Phone model., Cisco IP Phone - message button not working
 |
UPC - 746320318752
View all Cisco 7960 manuals
Add to My Manuals
Save this manual to your list of manuals |
Page 28 highlights
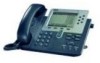
A Road Map to Your Cisco IP Phone Chapter 1 Introducing Your Cisco IP Phone 1 Handset with Functions like a traditional handset. The light strip at the indicator light top of the handset blinks when the phone rings and can be set to remain lit when you receive a voice mail message. For more information on working with the handset, refer to the "Adjusting the Handset, Speakerphone, and Headset Volume" section on page 2-1. 2 LCD screen Displays features such as the time, date, your phone number, caller ID, line/call status and softkey tabs. 3 Cisco IP Phone Indicates your Cisco IP Phone model. model type 4 Line or speed Opens a new line or speed dials the number on the LCD dial button screen. Phones in the Cisco IP Phone 7960 series have six line or speed dial buttons and phones in the 7940 series have two. 5 Footstand adjustment Allows you to adjust the angle of the phone base. 6 Directories button Provides access to call histories and directories (see the "Using the Feature Buttons" section on page 1-10.) 7 ? button Displays help on your LCD screen for a phone button or function (see the "Using the Feature Buttons" section on page 1-10.) 8 Settings button Provides access to phone settings such as contrast and ring sound, network configuration, and status information (see the "Using the Feature Buttons" section on page 1-10.) 9 Speaker button Toggles the speaker on or off. 10 Mute button Toggles the mute on or off. 11 Headset button Toggles the headset on or off. For more information on working with the headset, refer to the "Using the Headset" section on page 1-14. Cisco IP Phone 7960 and 7940 Series User Guide 1-8 78-10182-08
-
 1
1 -
2
-
3
-
4
-
5
-
6
-
7
-
8
-
9
-
10
-
11
-
12
-
13
-
14
-
15
-
16
-
17
-
18
-
19
-
20
-
21
-
22
-
 23
23 -
 24
24 -
 25
25 -
 26
26 -
 27
27 -
 28
28 -
 29
29 -
 30
30 -
 31
31 -
 32
32 -
 33
33 -
34
-
35
-
36
-
37
-
38
-
39
-
40
-
41
-
42
-
43
-
44
-
45
-
46
-
47
-
48
-
49
-
50
-
51
-
52
-
53
-
54
-
55
-
56
-
57
-
58
-
59
-
60
-
61
-
62
-
63
-
64
-
65
-
66
-
67
-
68
-
69
-
70
-
71
-
72
-
73
-
74
-
75
-
76
-
77
-
78
-
79
-
80
-
81
-
82
-
83
-
84
-
85
-
86
-
87
-
88
-
89
-
90
-
91
-
92
-
93
-
94
-
95
-
96
-
97
-
98
-
99
-
100
-
101
-
102
-
103
-
104
-
105
-
106
-
107
-
108
-
109
-
110
-
111
-
112
-
113
-
114
-
115
-
116
-
117
-
118
-
119
-
120
-
121
-
122
-
123
-
124
 |
 |
