Cisco 7962G User Guide - Page 18
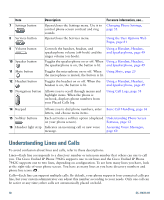
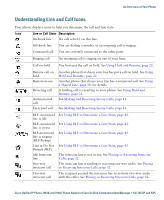
Understanding Lines and Calls - headsets for
 |
UPC - 882658140341
View all Cisco 7962G manuals
Add to My Manuals
Save this manual to your list of manuals |
Page 18 highlights
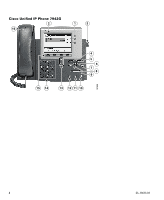
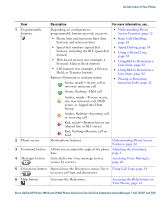
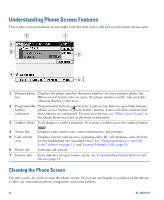
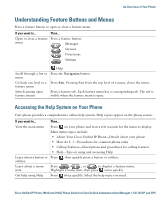
Item 7 Settings button 8 Services button Description Opens/closes the Settings menu. Use it to control phone screen contrast and ring sounds. Opens/closes the Services menu. For more information, see... Changing Phone Settings, page 52 Using the User Options Web Pages, page 61 9 Volume button 10 Speaker button Controls the handset, headset, and speakerphone volume (off-hook) and the ringer volume (on-hook). Using a Handset, Headset, and Speakerphone, page 49 Toggles the speakerphone on or off. When Using a Handset, Headset, the speakerphone is on, the button is lit. and Speakerphone, page 49 11 Mute button Toggles the microphone on or off. When Using Mute, page 23 the microphone is muted, the button is lit. 12 Headset button Toggles the headset on or off. When the Using a Handset, Headset, headset is on, the button is lit. and Speakerphone, page 49 13 Navigation button Allows you to scroll through menus and highlight items. When the phone is on-hook, displays phone numbers from your Placed Calls log. Using Call Logs, page 54 14 Keypad Allows you to dial phone numbers, enter Basic Call Handling, page 16 letters, and choose menu items. 15 Softkey buttons Each activates a softkey option (displayed Understanding Phone Screen on your phone screen). Features, page 12 16 Handset light strip Indicates an incoming call or new voice message. Accessing Voice Messages, page 60 Understanding Lines and Calls To avoid confusion about lines and calls, refer to these descriptions: Lines-Each line corresponds to a directory number or intercom number that others can use to call you. The Cisco Unified IP Phone 7962G supports one to six lines and the Cisco Unified IP Phone 7942G supports one to two lines, depending on configuration. To see how many lines you have, look at the right side of your phone screen. You have as many lines as you have directory numbers and phone line icons: . Calls-Each line can support multiple calls. By default, your phone supports four connected calls per line, but your system administrator can adjust this number according to your needs. Only one call can be active at any time; other calls are automatically placed on hold. 10 OL-19613-01
-
 1
1 -
2
-
3
-
4
-
5
-
6
-
7
-
8
-
9
-
10
-
11
-
12
-
 13
13 -
 14
14 -
 15
15 -
 16
16 -
 17
17 -
 18
18 -
 19
19 -
 20
20 -
 21
21 -
 22
22 -
 23
23 -
24
-
25
-
26
-
27
-
28
-
29
-
30
-
31
-
32
-
33
-
34
-
35
-
36
-
37
-
38
-
39
-
40
-
41
-
42
-
43
-
44
-
45
-
46
-
47
-
48
-
49
-
50
-
51
-
52
-
53
-
54
-
55
-
56
-
57
-
58
-
59
-
60
-
61
-
62
-
63
-
64
-
65
-
66
-
67
-
68
-
69
-
70
-
71
-
72
-
73
-
74
-
75
-
76
-
77
-
78
-
79
-
80
-
81
-
82
-
83
-
84
-
85
-
86
-
87
-
88
-
89
-
90
-
91
-
92
-
93
-
94
 |
 |