Cisco NSS4000 Getting Started Guide - Page 42
Step 12: Create a Scheduled Backup for a Share
 |
UPC - 745883577125
View all Cisco NSS4000 manuals
Add to My Manuals
Save this manual to your list of manuals |
Page 42 highlights
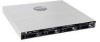
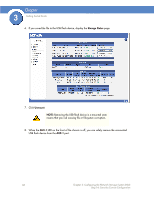
Chapter 3 Getting Sarted Guide 5. In the Reserve Size field, enter the amount of space that you want to allocate to the snapshot, and then select the unit from the drop-down menu. This space becomes unavailable for any other storage on the array. Note that you must enter a minimum of 32 MB in this field. NOTE: The snapshot is built at the array level. The Volume column currently shows the amount of space left on the array on which the volume is located. To calculate the reserve size, refer to the applicable volume size as listed on the Volume page. 6. Click Add to save the snapshot. Clicking Add saves the first snapshot. Each subsequent snapshot occurs based on the defined schedule. The snapshot details appear in the Currently Active Snapshots area at the top of the page. Step 12: Create a Scheduled Backup for a Share You can quickly configure a backup to run at a scheduled time interval for a share or group of shares. The backup can be saved to a remote CIFS server or to another share on the NSS. To set up a scheduled backup: 1. From the Manager Menu, click Shares Backup. 2. Click Schedule Backup. 40 Chapter 3: Configuring the Network Storage System (NSS) Step 12: Create a Scheduled Backup for a Share
-
 1
1 -
2
-
3
-
4
-
5
-
6
-
7
-
8
-
9
-
10
-
11
-
12
-
13
-
14
-
15
-
16
-
17
-
18
-
19
-
20
-
21
-
22
-
23
-
24
-
25
-
26
-
27
-
28
-
29
-
30
-
31
-
32
-
33
-
34
-
35
-
36
-
 37
37 -
 38
38 -
 39
39 -
 40
40 -
 41
41 -
 42
42 -
 43
43 -
 44
44 -
 45
45 -
 46
46 -
 47
47 -
48
-
49
-
50
-
51
-
52
-
53
-
54
-
55
 |
 |
