Cisco NSS4000 Getting Started Guide - Page 43
Scheduled Backups, Available Shares, Shares, to Backup, Remote CIFS Filer, Local File System,
 |
UPC - 745883577125
View all Cisco NSS4000 manuals
Add to My Manuals
Save this manual to your list of manuals |
Page 43 highlights
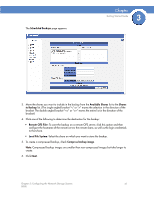
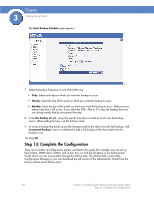
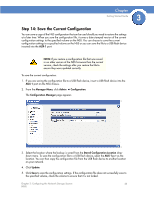
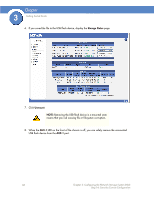
The Scheduled Backups page appears. Chapter Getting Started Guide 3 3. Move the shares you want to include in the backup from the Available Shares list to the Shares to Backup list. (The single angled bracket "" moves the selection in the direction of the bracket. The double angled bracket "" moves the entire list in the direction of the bracket.) 4. Click one of the following to determine the destination for the backup: • Remote CIFS Filer: To save the backup on a remote CIFS server, click this option and then configure the hostname of the remote server, the remote share, as well as the login credentials to that share. • Local File System: Select the share on which you want to store the backup. 5. To create a compressed backup, check Compress backup image. Note: Compressed backup images are smaller than non-compressed images but take longer to create. 6. Click Next. Chapter 3: Configuring the Network Storage System 41 (NSS)
-
 1
1 -
2
-
3
-
4
-
5
-
6
-
7
-
8
-
9
-
10
-
11
-
12
-
13
-
14
-
15
-
16
-
17
-
18
-
19
-
20
-
21
-
22
-
23
-
24
-
25
-
26
-
27
-
28
-
29
-
30
-
31
-
32
-
33
-
34
-
35
-
36
-
37
-
 38
38 -
 39
39 -
 40
40 -
 41
41 -
 42
42 -
 43
43 -
 44
44 -
 45
45 -
 46
46 -
 47
47 -
 48
48 -
49
-
50
-
51
-
52
-
53
-
54
-
55
 |
 |
