Cisco VG202 Hardware Installation Guide - Page 22
Port Numbering Conventions, Specifications, Software Elements, Configuration Connections - images
 |
View all Cisco VG202 manuals
Add to My Manuals
Save this manual to your list of manuals |
Page 22 highlights
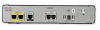
Port Numbering Conventions Chapter 1 Overview of the Cisco VG202 and Cisco VG204 Voice Gateways The onboard flash memory contains the Cisco IOS software image, boot flash contains the ROMMON boot code, and the anti-counterfeiting solution contains the cookie configuration. The Cisco IOS software is contained in 128 MB of flash memory on the Cisco VG202 and VG204 voice gateways. Onboard CPU memory is 128 MB. Port Numbering Conventions Port numbering conventions for the Cisco VG202 and VG204 voice gateways are as follows: • Fast Ethernet ports are numbered 0 and 1, from left to right. • FXS voice port numbering begins at 0 and reaches a maximum of 2 or 4, depending on the number of voice ports, from left to right. Specifications Table 1-2 shows the hardware and electrical speicfications for the Cisco VG202 and VG204 voice gateways. Table 1-2 Cisco VG202 and Cisco VG204 Voice Gateway Technical Specifications Characteristic Dimensions Weight Input power Operating temperature Operating humidity Noise level Agency approvals Value 1.75H x 9.75W x 8.0D in. (44.45 x 247.65 x 203.2 mm) 3.422 lb (1.55 kg) max 30 W 32 to 104° F (0 to 40° C) 5 to 95%, noncondensing n/a See the Regulatory Compliance and Safety Information for the Cisco VG202 and Cisco VG204 Voice Gateways document. Software Elements The operating system for the Cisco VG202 and VG204 voice gateways is the Cisco IOS software that resides in flash memory. Configuration Connections You can use an ASCII terminal or a PC to configure a Cisco VG202 or Cisco VG204 voice gateway. The configuration can be performed in several ways: • Locally, with a direct connection through the serial port • Remotely, with a connection through the serial port • Through Telnet and TFTP Cisco VG202 and Cisco VG204 Voice Gateways Hardware Installation Guide 1-6 OL-15959-01
-
 1
1 -
2
-
3
-
4
-
5
-
6
-
7
-
8
-
9
-
10
-
11
-
12
-
13
-
14
-
15
-
16
-
 17
17 -
 18
18 -
 19
19 -
 20
20 -
 21
21 -
 22
22 -
 23
23 -
 24
24 -
 25
25 -
 26
26 -
 27
27 -
28
-
29
-
30
-
31
-
32
-
33
-
34
-
35
-
36
-
37
-
38
-
39
-
40
-
41
-
42
-
43
-
44
-
45
-
46
-
47
-
48
-
49
-
50
 |
 |
