Clifford IntelliGuard 800 Owners Guide - Page 22
Matrix of user-selectable features
 |
View all Clifford IntelliGuard 800 manuals
Add to My Manuals
Save this manual to your list of manuals |
Page 22 highlights
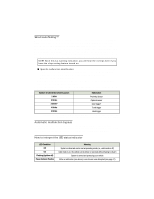
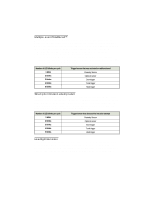
Matrix of user-selectable features Feature Select Column 1 1st latched Column 2 2nd latched Column 3 3rd latched Column 4 4th latched Column 5 5th latched Row 1 1st momentary Sound 1: on/off info on page 18 Add new remote to channel 1 info on page 8-9 NOTE 1 Test/adjust primary (normal) zone of the Proximity Sensor info on page 14 NOTE 7 QuietChirps: on/off info on page 18 Headlight Reminder: on/off info on page 17 Row 2 2nd momentary Sound 2: on/off info on page 18 Add new remote to channel 2 info on page 8-9 NOTE 2 Test/adjust secondary (high) zone of the Proximity Sensor info on page 14 NOTE 8 Long-term chirp silencing: on/off info on page 18 Channel 2 headlight timer: D 1sec-2.5min (30sec) info on page 10 NOTE 10 Row 3 3rd momentary Sound 3: on/off info on page 18 Add new remote to channel 3 info on page 8-9 NOTE 3 Pulsed/constant ground output upon panic 15-second entry delay: on/off info on page 13 Channel 4 output: pulsed, timed, latched Row 4 4th momentary Sound 4: on/off info on page 18 Add new remote to channel 4 info on page 8-9 NOTE 4 FACT: on/off info on page 15 AutoLock/UnLock: on/off info on page 18 Channel 5 output: pulsed, timed, latched Row 5 5th momentary Sound 5: on/off info on page 18 Add new remote to channel 5 info on page 8-9 NOTE 5 Factory-delayed courtesy lights: on/off Enhanced AutoArming: on/off info on page 13 Siren duration: 30/60 seconds info on page 18 Row 6 6th momentary Sound 6: on/off info on page 18 Erase all channels info on page 8-9 NOTE 6 Set a new secret valet code info on page 12 NOTE 9 AutoArm & Lock: on/off info on page 13 NOT USED Gray cells indicate features that require programming by trained Clifford installers. DO NOT change any of these settings. D WARNING: If you have remote window and sunroof closure, DO NOT CHANGE THIS SETTING: it requires installer-only adjustment. Changing the duration may cause damage. NOTE 1: Transmit channel 1 (or other channel of your choosing) of the new remote control. You will hear two chirps to indicate that the code has been accepted and recorded. NOTE 2: Transmit channel 2 (or other channel of your choosing) of the new remote control. You will hear two chirps to indicate that the code has been accepted and recorded. NOTE 3: Transmit channel 3 (or other channel of your choosing) of the new remote control. You will hear two chirps to indicate that the code has been accepted and recorded. NOTE 4: Transmit channel 4 (or other channel of your choosing) of the new remote control. You will hear two chirps to indicate that the code has been accepted and recorded. NOTE 5: Transmit channel 5 (or other channel of your choosing) of the new remote control. You will hear two chirps to indicate that the code has been accepted and recorded. NOTE 6: When you hear the two chirps, all remote control codes will have been erased from system memory. You must now add the new and/or existing remote controls to the system (i.e., program channels 1-5 of each remote that will be used with your IntelliGuard 800 system). 21 NOTE 7: Turn off the ignition, leave the driver's window open and exit the vehicle. To test the current sensitivity, lean into the passenger compartment through the window. When the sensor detects the intrusion, the system will sound a single confirmation chirp. To increase the sensitivity setting, press button 2 (you'll hear higher and higher confirmation chirps). To decrease sensitivity, press button 4 (you'll hear lower and lower chirps). Retest by leaning through the window. When satisfied with the sensitivity setting, press button 1 to record the new sensitivity level and exit sensor test/adjust mode (you'll hear 3 chirps to confirm this). You may now either arm the system with channel 1 or enter the vehicle. NOTE 8: Use the same procedure as NOTE 7, but adjust the sensor to detect your presence when you lean within a foot of the driver's window. NOTE 9: Immediately flip the switch to its latched position, then enter the new code that you wish to use. Make sure to return the switch to its center position when complete, then wait 3 seconds (you will hear two chirps when the system has accepted the new code). Turn the ignition off. VERY IMPORTANT: You must immediately test your new secret disarming/valet code: Turn the ignition on, enter your new code, then flip the switch to its latched position. The LED will illuminate. If it does not, the new code you programmed and the one you just entered do not match. The system has reverted to the previous code. NOTE 10: The timer starts as soon as you enable this feature (5 latches, 2 momentaries). When the duration you wish has been reached, press button 1 on the remote control. You will hear two chirps to confirm the new duration. Channel 4 and/or 5 will have this same duration if one or both of these were set by your installer to operate as a timed output. 22
-
 1
1 -
2
-
3
-
4
-
5
-
6
-
7
-
8
-
9
-
10
-
11
-
12
-
13
-
14
-
15
-
16
-
 17
17 -
 18
18 -
 19
19 -
 20
20 -
 21
21 -
 22
22 -
 23
23
 |
 |
