Cobra CDR 820 CDR 820 Manual - Page 10
Adjusting Camera Settings - shuts off
 |
View all Cobra CDR 820 manuals
Add to My Manuals
Save this manual to your list of manuals |
Page 10 highlights
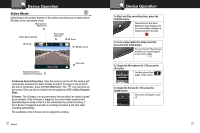
Adjusting Camera Settings Your Dash Cam Video Settings • Note: If you are currently recording video ( ) you'll need to stop recording with the RECORD button first. While in VIDEO mode, press the MENU button once to enter the menu selection screen. Verify that Video Settings is selected, then press MODE to confirm. Press the UP and DOWN arrows to select the setting you'd like to modify, then press the MODE button to confirm. A window on the right edge of the screen will display the available options. Use the UP and DOWN arrows to make your selection, then press MODE to confirm. A list of the settings and their meanings are shown on the next page. 14 English Adjusting Camera Settings Your Dash Cam Adjusting Video Settings • Movie Mode Settings Video Settings Movie Quality This sets the level of detail in the video. FHD will give you the best image, but will take up the most memory. Select between Super High Quality (SHQ) and High Quality (HQ) Movie Clip Time Auto Power Off This selects the length of the video clips the system records. Options range from 1 minute to 10 minutes. Once power is removed from the device, it automatically shuts down. This option lets you set how many seconds to continue recording video after power is removed. Motion REC Time Microphone MIC sensitivity Scene Exposure White Balance ISO Sensitivity Color When the Motion Event REC feature is turned on, the camera will anayze the image and determine when the image has changed substantially, and automatically start recording for you. Leave this feature on if you want to record video when you're moving, and stop recording video when stopped. If you do not want this device to record audio with its internal microphone, turn this setting off. Set the sensitivity of the microphone. Select between Auto, Sport, Portrait, Landscape, Snow, Beach, and Fireworks. In very bright environments, use a positive EV. Dark environments use negative EV. Options between -2 and +2 are available. You can adjust the white balance based on the ambient lighting. Options include: Auto, Daylight, Cloudy, Flourescent 1, Flourescent 2, and Flourescent 3. Increasing ISO will make the camera more sensitive to light. Try increasing ISO in low-light conditions, or leave it set to "Auto" Adjusts color saturation. Options include: natural, bright, and grey. Effect Photo effects include: Normal, retro, black and white, relief, negative, drawing, painting, and crayon. 15
-
 1
1 -
2
-
3
-
4
-
 5
5 -
 6
6 -
 7
7 -
 8
8 -
 9
9 -
 10
10 -
 11
11 -
 12
12 -
 13
13
 |
 |
