Cobra CDR 895 D CDR 895 D Product Manual - Page 7
Installation - hardwire
 |
View all Cobra CDR 895 D manuals
Add to My Manuals
Save this manual to your list of manuals |
Page 7 highlights
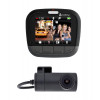
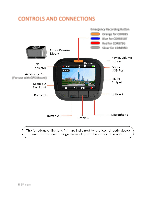
INSTALLATION 1 MOUNT To install the Suction Cup Windshield Mount peel the plastic film off of the suction cup. Press the suction cup FIRMLY onto the windshield. Flip the locking lever to secure the suction cup in place. The suction cup can be moved freely by disengaging and re-engaging the locking lever. Screw the Quick Release Mount onto the Suction Cup Mount and then slide the Dash Cam onto the Quick Release Mount. Tighten the thumbwheel nut against the Quick Release Mount once it is correctly positioned. 2 POWER Plug one end of the supplied 12V Vehicle Power Adapter into your vehicle's cigarette lighter, and the other end into the Micro USB port. The unit will automatically turn on and start recording. To manually power on the device, PRESS AND HOLD the Power button until the display activates. When the power button is used to power on the unit recording must be started manually. Note: A Hardwire Kit (CA-MicroUSB-001) is available at www.cobra.com for a more permanent installation that allows for discrete routing of the power cable. 3 DRIVE! Drive HD Dash Cams are designed to set and forget. After initial setup, the unit will turn on and start recording as soon as power is applied. When the Micro SD card is full the oldest footage will be deleted to make way for the new. If you witness something that you don't want to be deleted, simply press the Emergency Record button and it will be saved forever. 7|Page
-
 1
1 -
 2
2 -
 3
3 -
 4
4 -
 5
5 -
 6
6 -
 7
7 -
 8
8 -
 9
9 -
 10
10 -
 11
11 -
 12
12 -
13
-
14
-
15
-
16
-
17
-
18
-
19
-
20
-
21
-
22
-
23
 |
 |
