Cobra DASH 2316D DASH Series Manual - Page 8
Dual Cam Installation
 |
View all Cobra DASH 2316D manuals
Add to My Manuals
Save this manual to your list of manuals |
Page 8 highlights
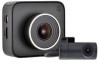
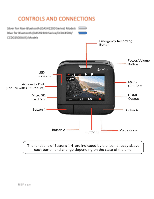
CAM 2 DUAL CAM INSTALLATION 1 MOUNT CAM 1 - Slide the dash cam onto the adhesive mount and twist to tighten the cam in desired location. Find the spot on your windshield where you would like to mount the camera and confirm the placement. Reminder, this is an adhesive mount so it is important to mount correctly the first time. Next, peel the plastic film off the 3M adhesive and press the mount FIRMLY onto the windshield. CAM 2 - Attach CAM 2 to the windshield using the adhesive tape. CAM 2 is most commonly installed facing out the rear on the top center of the rear windshield. It can also be mounted on the front windshield to record the interior of the vehicle. 2 POWER CAM 2 Extender Cable (Opঞonal) Power Cord 10 Ft. (3M) CAM 1 Y-Spli‚er Cable The Dual View Models utilize a Y-Splitter and CAM 2 Extender Cable to offer maximum flexibility and clean installation without dangling wires. • Plug the Y-Splitter into the Micro USB Port on CAM 1. • Connect the Micro USB end of the power cord into the Y-Splitter. Connect the USB end of the power cord in the Cigarette Lighter Adapter and then plug into your vehicle. • Plug CAM 2 into the Y-Splitter. Use the Extender Cable if necessary. • Organize and tuck away cables to make sure that the driver's view is not obstructed. In most vehicles it's possible to tuck Y-Splitter and cables into the headliner and cleanly hide the extender cable along the top wall all the way to the rear of the vehicle. Professional installation is recommended. If CAM 2 videos appear upside-down enter the Video Settings Menu on CAM 1 and turn Flip Cam 2 to ON. If you have mounted CAM 2 facing forward enter the Video Settings Menu on CAM 1 and turn Mirror CAM 2 to OFF. 8|Page
-
 1
1 -
2
-
 3
3 -
 4
4 -
 5
5 -
 6
6 -
 7
7 -
 8
8 -
 9
9 -
 10
10 -
 11
11 -
 12
12 -
 13
13 -
14
-
15
-
16
-
17
-
18
-
19
-
20
-
21
-
22
-
23
 |
 |
