Cobra RAD 700i Main Product Image DriveSmarter App Carplay Update RAD 700i Man - Page 9
Alert Settings, User Settings, Detail, Language, Smart Power, System Info, Restore Defaults, Exit
 |
View all Cobra RAD 700i Main Product Image DriveSmarter App Carplay Update manuals
Add to My Manuals
Save this manual to your list of manuals |
Page 9 highlights
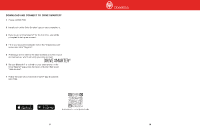
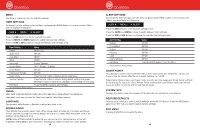
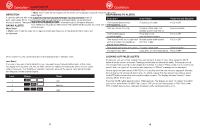
Operation MENU The Menu is broken up into User and Alert settings. USER SETTINGS To change the User settings, enter the Menu by pressing the MENU button. A voice announces "Menu" and the display will change to: Press the DIM button to enter the User settings menu. Press the MARK and MENU buttons to switch between User settings. Press the DIM or SEN buttons to change the selected User setting's value. User Setting Detail Quiet Drive Auto Mute Voice Language Screen Saver Smart Power Display Car Voltage System Info Restore Defaults Exit Menu *Denotes factory default settings Value More*/Less Off*/On Off/On* Off/On* English*/Spanish Off / 1 Minute* / 3 Minute Off*/On Off*/On Press the SEN button to display system information Press the SEN button to restore factory default settings then press SEN button again to confirm (not displayed until a setting has changed) Press the MENU button to exit the Menu DETAIL More detail mode displays information about the radar band, signal strength and frequency. Less detail mode only provides the threat level (see the Radar Alerts section). LANGUAGE Can be set to either English or Spanish for all text and voice audio. SCREEN SAVER Your detector has a screen saver mode. When screen saver is turned on, the screen will change to Dark after the selected time interval (factory default is 3 minutes). While the screen is Dark, the scanner will be displayed dimly. NOTE: While SCREEN SAVER is activated, any alert will turn the display back on at the last brightness setting (Bright, Dim or Dimmer). Touching any button will also turn on the display. 15 Operation ALERT SETTINGS To change the Alert settings, enter the Menu by pressing the MENU button. A voice announces "Menu" and the display will change to: Press the SEN button to enter the Alert settings menu. Press the MARK and MENU buttons to switch between Alert settings. Press the DIM or SEN buttons to change the selected Alert setting's value. Alert Setting X Band K Low Band K Band Ka Band Laser Low V. Warning Exit Menu *Denotes factory default settings Value Off/On* Off*/On Off/On* Off/On* Off/On* Off*/On Press the MENU button to exit the Menu SMART POWER Your detector includes the Smart Power feature that, when turned On, will put the unit into Low Power mode 15 minutes after the car's engine has been turned Off. Before Smart Power enters Low Power mode, you will hear three beeps and Smart Power will flash on the display. To return the unit to Normal Power mode and exit Low Power mode, start the car, press any button or turn the unit Off and then On again. SYSTEM INFO Displays information about the versions of firmware that are installed on your detector. RESTORE DEFAULTS To return your detector to factory default settings, press the SEN Button. Press the SEN Button again to confirm that you want to restore factory settings. EXIT MENU Pressing the MENU button exits the Menu. 16
-
 1
1 -
2
-
3
-
 4
4 -
 5
5 -
 6
6 -
 7
7 -
 8
8 -
 9
9 -
 10
10 -
 11
11 -
 12
12
 |
 |
