Coby KTFDVD1093 User Manual - Page 5
Identification of Controls - 10 2
 |
UPC - 716829931097
View all Coby KTFDVD1093 manuals
Add to My Manuals
Save this manual to your list of manuals |
Page 5 highlights
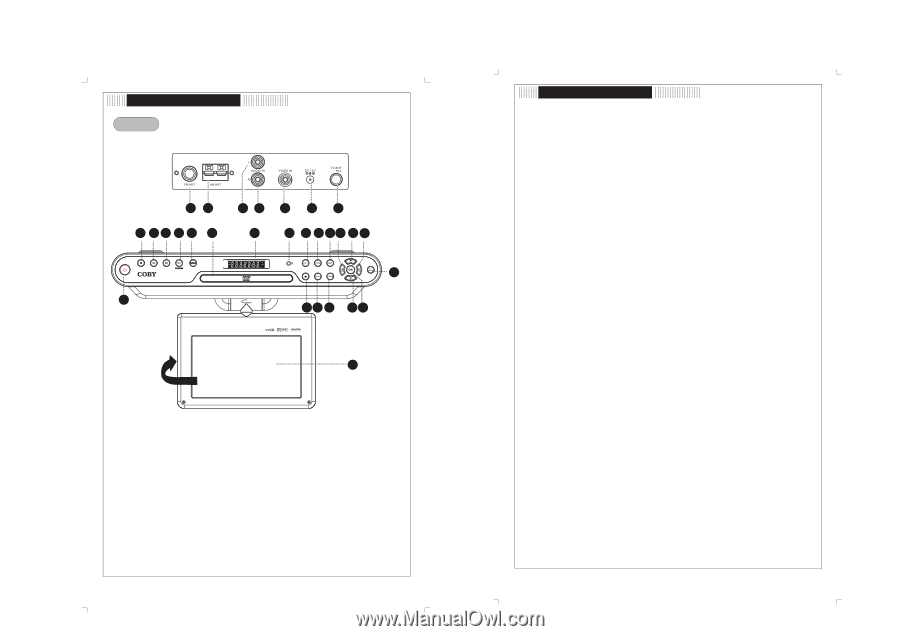
enti ication o ontro s Main Unit Connectors on the unit's rear panel. 22 23 1 23 4 5 6 24 25 26 27 28 7 8 9 10 11 12 13 14 15 20 19 18 17 16 29 21 SWIVEL PANEL Pivot the screen forward until a comfortable viewing angle is reached. The screen may also be rotated from side to side, do not force the screen beyond its rotational limit. When the screen will not be used, just fold up with the LCD side facing inward. 1. STOP 2. SKIP BACKWARD 3. SKIP FORWARD 4.PLAY/PAUSE 5. MODE 6. DISC TRAY 7. LCD DISPLAY 8. REMOTE SENSER 9. EXIT 10. TIME 11. SET 12. TUNING-/LEFT DIRECTION 13. CHANNEL+/UP DIRECTION 14. TUNING+/RIGHT DIRECTION 15. TV/SETUP 16. CHANNEL-/DOWN DIRECTION 17. VOL+ 18. VOL19. OPEN/CLOSE .3. 20. POWER 21. SWIVEL PANEL 22. FM ANTENNA JACK 23. AM ANTENNA JACK 24. AUDIO L 25. AUDIO R 26. VIDEO IN 27. POWER JACK 28. TV ANTENNA JACK 29. OK Identification of Controls 1. STOP 14. TUNING+/RIGHT DIRECTION Under the DVD mode, press to stop playback. Under the tuner mode, press briefly to skip Under the tuner mode, press to clear the forward. Press and hold the button to search fast incorrect input when programming channels. forward. 2. PREV It also works as the right direction button while Press the button briefly to skip backward. working with the menu. Press and hold the button to search fast 15. TV/SETUP backward. Press to display the menu. 3. NEXT 16. CHANNEL-/DOWN DIRECTION Press the button briefly to skip forward. Under the TV/tuner mode, press to skip channels. Press and hold the button to search fast It also works as the down direction button while forward. working with the menu. 4.PLAY/PAUSE 17. VOL+ Under the DVD mode, press to start/hold playback. Press to adjust the volume up. Under the tuner mode, press to set the band as AM/FM. 18. VOL- 5. MODE Press to adjust the volume down. Press to shift modes. 19. OPEN/CLOSE 6. DISC TRAY Press to open/close the disc tray. Hold the disc. 20. POWER 7. VFD DISPLAY Press to turn the power on/off. Display the working information. 21. SWIVEL PANEL 8. REMOTE SENSER Present the high resolution picture. Sense the remote signal. The panel can be turned by 270 degrees for the 9. EXIT different viewing positions. When the panel will not Press to exit the system menu. be used, just fold up with the LCD side facing inward. 10. TIME 22. FM ANTENNA JACK Repeatedly press the button to show the following FM antenna connector. information. 23. AM ANTENNA JACK Clock- > Week- > Date - > Alarm- > Display Off. AM antenna connector. Please refer to the "Basic Operation" section for 24. AUDIO L details. Audio signal input L. 11. SET 25. AUDIO R Press to set the clock/week/date/alarm. Audio signal input R. Please refer to the "Basic Operation" section for 26. VIDEO IN details. Video signal input. 12. TUNING-/LEFT DIRECTION 27. POWER JACK Under the tuner mode, press briefly to skip Connect with the power source. backward. 28. TV ANTENNA JACK Press and hold the button to search fast backward. TV antenna connector. It also works as the left direction button while 29. OK working with the menu. Press to confirm settings. 13. CHANNEL+/UP DIRECTION It also works as the memory button under the Under the TV/tuner mode, press to skip channels. tuner mode. It also works as the up direction button while working with the menu. .4.
-
 1
1 -
 2
2 -
 3
3 -
 4
4 -
 5
5 -
 6
6 -
 7
7 -
 8
8 -
 9
9 -
 10
10 -
 11
11 -
12
-
13
-
14
 |
 |