Compaq Evo n600c Compaq Evo Notebook N600c, N610c, N610v and N620c Notebook PC - Page 129
Removing the Keyboard Screw, Turn the notebook top side up with the front facing you.
 |
View all Compaq Evo n600c manuals
Add to My Manuals
Save this manual to your list of manuals |
Page 129 highlights
Removal and Replacement Procedures 1. Prepare the notebook for disassembly (Section 5.3). 2. Turn the notebook bottom side up with the front facing you. 3. Remove the TM2.5 × 7.0 screw that secures the keyboard to the base enclosure (Figure 5-10). Figure 5-10. Removing the Keyboard Screw 4. Turn the notebook top side up with the front facing you. 5. Open the notebook. Maintenance and Service Guide 5-19
-
 1
1 -
2
-
3
-
4
-
5
-
6
-
7
-
8
-
9
-
10
-
11
-
12
-
13
-
14
-
15
-
16
-
17
-
18
-
19
-
20
-
21
-
22
-
23
-
24
-
25
-
26
-
27
-
28
-
29
-
30
-
31
-
32
-
33
-
34
-
35
-
36
-
37
-
38
-
39
-
40
-
41
-
42
-
43
-
44
-
45
-
46
-
47
-
48
-
49
-
50
-
51
-
52
-
53
-
54
-
55
-
56
-
57
-
58
-
59
-
60
-
61
-
62
-
63
-
64
-
65
-
66
-
67
-
68
-
69
-
70
-
71
-
72
-
73
-
74
-
75
-
76
-
77
-
78
-
79
-
80
-
81
-
82
-
83
-
84
-
85
-
86
-
87
-
88
-
89
-
90
-
91
-
92
-
93
-
94
-
95
-
96
-
97
-
98
-
99
-
100
-
101
-
102
-
103
-
104
-
105
-
106
-
107
-
108
-
109
-
110
-
111
-
112
-
113
-
114
-
115
-
116
-
117
-
118
-
119
-
120
-
121
-
122
-
123
-
 124
124 -
 125
125 -
 126
126 -
 127
127 -
 128
128 -
 129
129 -
 130
130 -
 131
131 -
 132
132 -
 133
133 -
 134
134 -
135
-
136
-
137
-
138
-
139
-
140
-
141
-
142
-
143
-
144
-
145
-
146
-
147
-
148
-
149
-
150
-
151
-
152
-
153
-
154
-
155
-
156
-
157
-
158
-
159
-
160
-
161
-
162
-
163
-
164
-
165
-
166
-
167
-
168
-
169
-
170
-
171
-
172
-
173
-
174
-
175
-
176
-
177
-
178
-
179
-
180
-
181
-
182
-
183
-
184
-
185
-
186
-
187
-
188
-
189
-
190
-
191
-
192
-
193
-
194
-
195
-
196
-
197
-
198
-
199
-
200
-
201
-
202
-
203
-
204
-
205
-
206
-
207
-
208
-
209
-
210
-
211
-
212
-
213
-
214
-
215
-
216
-
217
 |
 |
Removal and Replacement Procedures
Maintenance and Service Guide
5–19
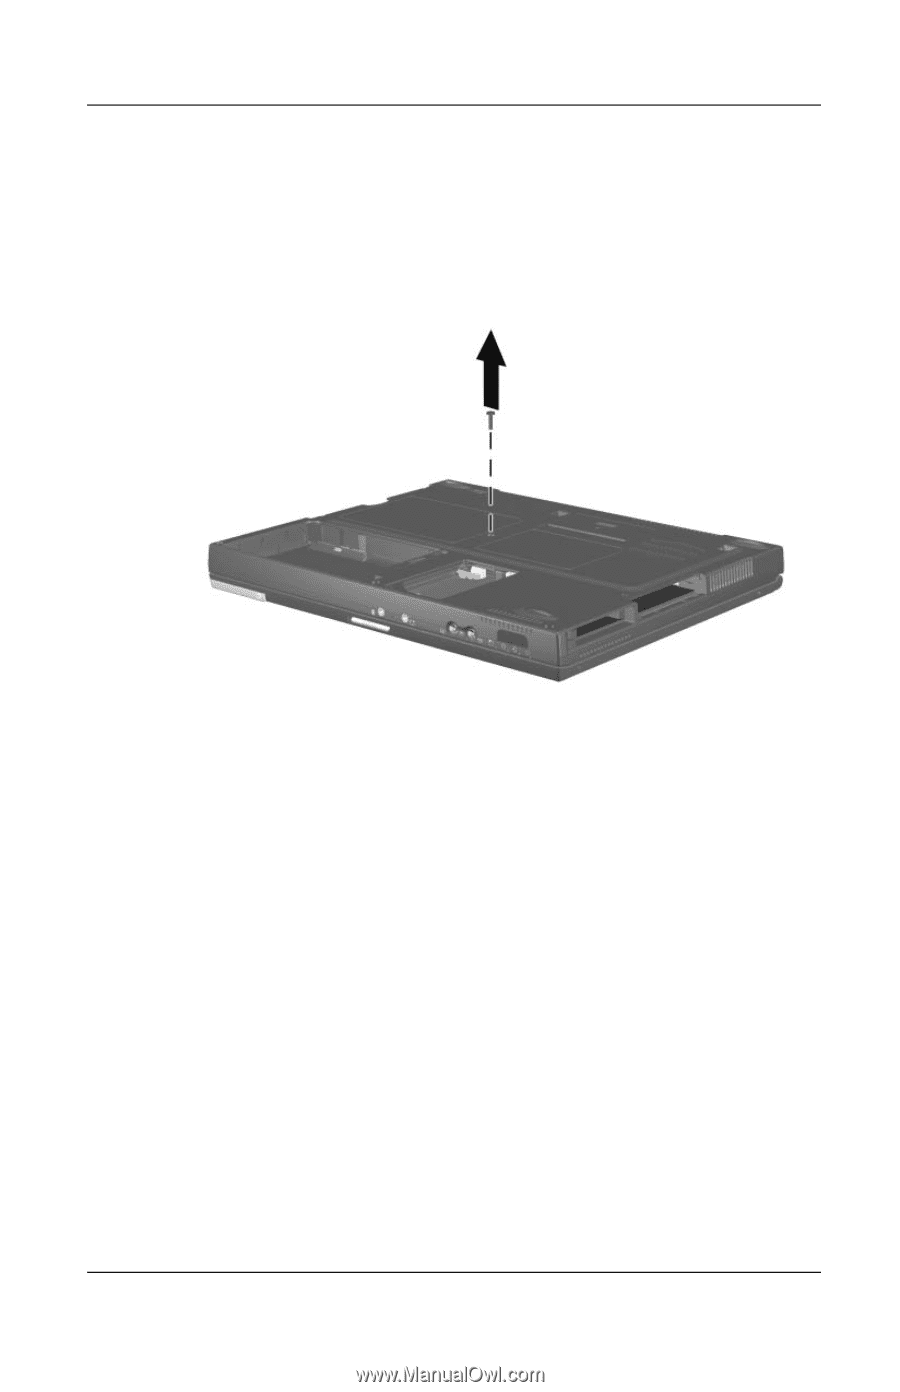
1. Prepare the notebook for disassembly (Section 5.3).
2. Turn the notebook bottom side up with the front facing you.
3. Remove the TM2.5 × 7.0 screw that secures the keyboard to
the base enclosure (Figure 5-10).
Figure 5-10. Removing the Keyboard Screw
4. Turn the notebook top side up with the front facing you.
5. Open the notebook.