Compaq Presario 1900 Model XL1-XL165-Maintenance & Service Guide Presario - Page 24
Status Panel
 |
View all Compaq Presario 1900 manuals
Add to My Manuals
Save this manual to your list of manuals |
Page 24 highlights
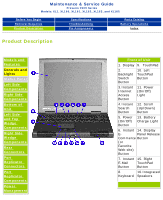
Maintenance & Service Guide Presario 1900 Series Models: XL1, XL160, XL161, XL162, XL163, and XL165 Before You Begin Removal Sequence Product Description Specifications Troubleshooting Pin Assignments Parts Catalog Battery Operations Index Product Description Models and Features Controls and Lights Status Panel Left Side Components Right Side Components Bottom of Unit Left Side and Top Wedge Components Right Side Wedge Components Rear Connectors Port Replicator Connectors Port Replicator Components Power Management Left Side Components 1. Security Lock 2. Air Vent 3. PC Card Slots 4. PC Card Eject Levers 5. Hard Drive
-
 1
1 -
2
-
3
-
4
-
5
-
6
-
7
-
8
-
9
-
10
-
11
-
12
-
13
-
14
-
15
-
16
-
17
-
18
-
 19
19 -
 20
20 -
 21
21 -
 22
22 -
 23
23 -
 24
24 -
 25
25 -
 26
26 -
 27
27 -
 28
28 -
 29
29 -
30
-
31
-
32
-
33
-
34
-
35
-
36
-
37
-
38
-
39
-
40
-
41
-
42
-
43
-
44
-
45
-
46
-
47
-
48
-
49
-
50
-
51
-
52
-
53
-
54
-
55
-
56
-
57
-
58
-
59
-
60
-
61
-
62
-
63
-
64
-
65
-
66
-
67
-
68
-
69
-
70
-
71
-
72
-
73
-
74
-
75
-
76
-
77
-
78
-
79
-
80
-
81
-
82
 |
 |

Maintenance & Service Guide
Presario 1900 Series
Models: XL1, XL160, XL161, XL162, XL163, and XL165
Before You Begin
Specifications
Parts Catalog
Removal Sequence
Troubleshooting
Battery Operations
Product Description
Pin Assignments
Index
Product Description
Models and
Features
Controls and
Lights
Status Panel
Left Side
Components
Right Side
Components
Bottom of
Unit
Left Side
and Top
Wedge
Components
Right Side
Wedge
Components
Rear
Connectors
Port
Replicator
Connectors
Port
Replicator
Components
Power
Management
Left Side
Components
1. Security
Lock
2. Air Vent
3. PC Card
Slots
4. PC Card
Eject Levers
5. Hard Drive