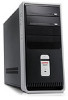
Compaq Presario SR1000 Getting Started Guide - Page 10
Setting Up and Connecting to Your Internet Account, Easy Setup, Easy Internet Sign-up, Start - manual
 |
View all Compaq Presario SR1000 manuals
Add to My Manuals
Save this manual to your list of manuals |
Page 10 highlights
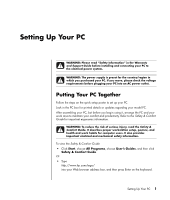
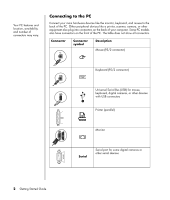
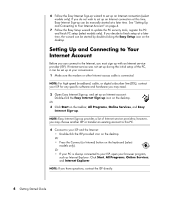
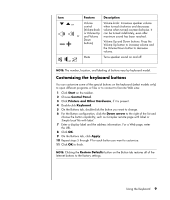
6 Follow the Easy Internet Sign-up wizard to set up an Internet connection (select models only). If you do not wish to set up an Internet connection at this time, Easy Internet Sign-up can be manually started at a later time. See "Setting Up and Connecting to Your Internet Account" on page 4. 7 Follow the Easy Setup wizard to update the PC security tools, register the PC and finish PC setup (select models only). If you decide to finish setup at a later time, the wizard can be started by double-clicking the Easy Setup icon on the desktop. Setting Up and Connecting to Your Internet Account Before you can connect to the Internet, you must sign up with an Internet service provider (ISP). If Internet service was not set up during the initial setup of the PC, it can be set up at your convenience. 1 Make sure the modem or other Internet access cable is connected. NOTE: For high-speed broadband, cable, or digital subscriber line (DSL), contact your ISP for any specific software and hardware you may need. 2 Open Easy Internet Sign-up, and set up an Internet account: Double-click the Easy Internet Sign-up icon on the desktop. Or 3 Click Start on the taskbar, All Programs, Online Services, and Easy Internet Sign-up. NOTE: Easy Internet Sign-up provides a list of Internet service providers; however, you may choose another ISP or transfer an existing account to this PC. 4 Connect to your ISP and the Internet: • Double-click the ISP-provided icon on the desktop. Or • Press the Connect (or Internet) button on the keyboard (select models only). Or • If your PC is always connected to your ISP, open your browser program, such as Internet Explorer: Click Start, All Programs, Online Services, and Internet Explorer. NOTE: If you have questions, contact the ISP directly. 4 Getting Started Guide
-
 1
1 -
2
-
3
-
4
-
 5
5 -
 6
6 -
 7
7 -
 8
8 -
 9
9 -
 10
10 -
 11
11 -
 12
12 -
 13
13 -
 14
14 -
 15
15 -
16
-
17
-
18
-
19
-
20
-
21
-
22
-
23
-
24
-
25
-
26
-
27
-
28
-
29
-
30
-
31
-
32
-
33
-
34
-
35
-
36
-
37
-
38
-
39
-
40
-
41
-
42
-
43
-
44
-
45
-
46
-
47
-
48
-
49
-
50
-
51
-
52
-
53
-
54
-
55
-
56
-
57
-
58
-
59
-
60
-
61
-
62
-
63
-
64
-
65
-
66
-
67
-
68
-
69
-
70
-
71
-
72
-
73
-
74
-
75
-
76
-
77
-
78
-
79
-
80
-
81
-
82
-
83
-
84
-
85
-
86
-
87
-
88
-
89
-
90
-
91
-
92
 |
 |
