Computer Associates ETRAVE7130BPWE User Guide - Page 11
Schedule a Scan
 |
UPC - 757943273977
View all Computer Associates ETRAVE7130BPWE manuals
Add to My Manuals
Save this manual to your list of manuals |
Page 11 highlights
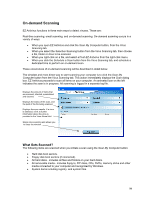
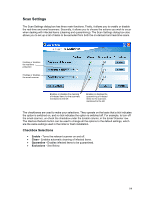
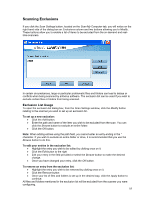
Detections If a virus is detected when performing an on-demand scan, the infection will be displayed in the scan results table (see below). All scans performed by the on-demand scanner are also logged. The scan results include three pieces of information: • File Name - displays the path and name of the file determined to be infected (long paths may need the separator bar adjusted). • Virus Name - displays the name of the virus found. This text will be in the form of a hyperlink. If you are connected to the Internet, and click the virus name, your browser will load and specific virus information will be displayed (if available). • Status - the status will be displayed. The status of the infection includes infected, removed quarantined, cleaned and corrupt. Path of infected item Name of infection including hyperlink to web based virus description information Status of infected item Schedule a Scan EZ Antivirus allows you to set a time to perform an automatic scan on a regular basis - the scheduled scan. Scheduling a scan can be very useful if you wish to scan your computer regularly, but do not wish to wait at the computer until the scan finishes. To enable and configure the scheduled scan, click the Schedule a Scan button located on the Virus Scanning tab. Schedule Scan Settings The Schedule Scan Settings dialog box allows you to enable and configure the scheduled scan. 11
-
 1
1 -
2
-
3
-
4
-
5
-
 6
6 -
 7
7 -
 8
8 -
 9
9 -
 10
10 -
 11
11 -
 12
12 -
 13
13 -
 14
14 -
 15
15 -
 16
16 -
17
-
18
-
19
-
20
-
21
-
22
-
23
-
24
-
25
-
26
 |
 |
