Craftsman 21602 Operation Manual - Page 20
FIG. I, J, K
 |
View all Craftsman 21602 manuals
Add to My Manuals
Save this manual to your list of manuals |
Page 20 highlights
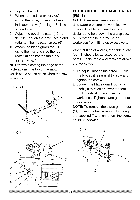
PIN-END BLADE INSTALLATION (FIG. I, J, K) NOTE: Do not tighten the set screw (1, 2) when using Pin-end blades. (Fig. J) ,& WARNING I In order to avoid uncontrollable lifting of the workpiece, the teeth of the blade MUST ALWAYS point downward. (Fig. I) 3. Tighten the tension on the blade by turning the tension knob clockwise (Fig. K). If the tension is too tight, turn counterclockwise. If too loose, turn the knob clockwise. Fig. K Fig. I 1. Install the blade (3) by inserting one end of it through the access hole (4) of throat plate in the table. Hook the lower blade pin in the pin recess in the lower blade holder (5) and then the upper blade pin in the upper blade holder (6). (Fig. J) 2. Check to see that the pins are properly located in the upper (6) and the lower (5) blade holders. (Fig. J) PLAIN-END BLADE REMOVAL AND INSTALLATION This scroll saw accepts 5-inch plainend or pin-end blades to cut a wide variety of materials. Plain-end type blades are recommended whenever fine, accurate and intricate work is being performed on 3/4 in. or thinner material. It will take slightly longer to assemble and tension the blade, but you will also be able to use finer blades for cutting a thinner kerf. Fig. J I,A WARNING To avoid injury from accidental starting, always turn the switch OFF and remove power cord plug from 1 power source before removing or 6 replacing the blade.
-
 1
1 -
2
-
3
-
4
-
5
-
6
-
7
-
8
-
9
-
10
-
11
-
12
-
13
-
14
-
 15
15 -
 16
16 -
 17
17 -
 18
18 -
 19
19 -
 20
20 -
 21
21 -
 22
22 -
 23
23 -
 24
24 -
 25
25 -
26
-
27
-
28
-
29
-
30
-
31
-
32
-
33
-
34
-
35
-
36
 |
 |