Creative 70pf165000017 User Guide - Page 39
Recording with the built-in microphone, Extras, Microphone, YYYY-MM-DD HH:MM:SS
 |
UPC - 054651116337
View all Creative 70pf165000017 manuals
Add to My Manuals
Save this manual to your list of manuals |
Page 39 highlights
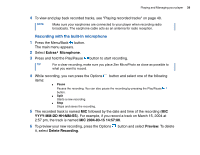
Playing and Managing your player 39 4 To view and play back recorded tracks, see "Playing recorded tracks" on page 40. NOTE Make sure your earphones are connected to your player when recording radio broadcasts. The earphone cable acts as an antenna for radio reception. Recording with the built-in microphone 1 Press the Menu/Back button. The main menu appears. 2 Select Extras Microphone. 3 Press and hold the Play/Pause button to start recording. TIP For a clear recording, make sure you place Zen MicroPhoto as close as possible to what you want to record. 4 While recording, you can press the Options button and select one of the following items: ■ Pause Pauses the recording. You can also pause the recording by pressing the Play/Pause button. ■ Split Starts a new recording. ■ Stop Stops and saves the recording. 5 The recorded track is named MIC followed by the date and time of the recording (MIC YYYY-MM-DD HH:MM:SS). For example, if you record a track on March 15, 2004 at 2:57 pm, the track is named MIC 2004-03-15 14:57:00. 6 To preview your new recording, press the Options button and select Preview. To delete it, select Delete Recording.
-
 1
1 -
2
-
3
-
4
-
5
-
6
-
7
-
8
-
9
-
10
-
11
-
12
-
13
-
14
-
15
-
16
-
17
-
18
-
19
-
20
-
21
-
22
-
23
-
24
-
25
-
26
-
27
-
28
-
29
-
30
-
31
-
32
-
33
-
 34
34 -
 35
35 -
 36
36 -
 37
37 -
 38
38 -
 39
39 -
 40
40 -
 41
41 -
 42
42 -
 43
43 -
 44
44 -
45
-
46
-
47
-
48
-
49
-
50
-
51
-
52
-
53
-
54
-
55
-
56
-
57
-
58
-
59
-
60
-
61
-
62
-
63
-
64
-
65
-
66
-
67
 |
 |
