Creative ZEN Training Guide - Page 5
Again? - manual
 |
UPC - 054651175822
View all Creative ZEN manuals
Add to My Manuals
Save this manual to your list of manuals |
Page 5 highlights
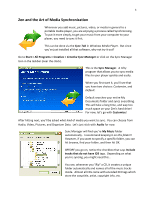
5 Sometimes, CDs do not have this ID3 tag encoded into the tracks. And when you try to rip it, it will go to a folder called Unknown Artist. Even though you might have renamed them all, these tracks will still not have an ID3 tag until you create it specifically. So, if you have any music that ripped into an Unknown Artist folder, or any music that you acquired by less-than-ethical means (burns, torrents, P2P software, etc.) then you need to check the box that says "Include tracks that do not have ID3 tags." If all of your music was acquired legally, and you ripped it without any problems, then don't worry about it! Automatic or Manual... After hitting next you are taken to a screen that gives you a choice, Automatic or Manual Synchronization. Pick Manual to avoid confusion for now. If you pick automatic your Zen will start syncing every time you plug it in! And we don't really want that. After that, you are taken to a review screen where you can confirm all of the folders and checkboxes are correct. If they are, check the box at the bottom of the screen that says Synchronize Now and then hit Finish! Again? Interestingly enough, you can't run the manager again! At least not the way you just saw it. That's why it's recommended you keep the My Music folder as the default! However, if you pointed to another folder, you are far from out of luck! With your Zen plugged in, go to My Computer and then look for a black Zen icon that says Zen V Series Media Explorer. Voila! This opens up the Media Explorer tool. From here you can drag and drop your media, Rip CDs (that means copy music from them) and even convert video files so that you can play them on your Zen!
-
 1
1 -
 2
2 -
 3
3 -
 4
4 -
 5
5 -
 6
6 -
 7
7 -
 8
8 -
 9
9 -
 10
10
 |
 |
