Cub Cadet CC 310 Operation Manual - Page 11
Maintenance
 |
View all Cub Cadet CC 310 manuals
Add to My Manuals
Save this manual to your list of manuals |
Page 11 highlights
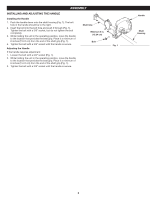
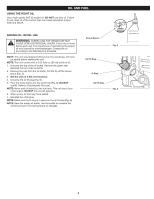
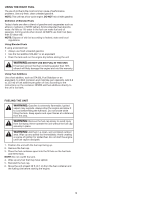
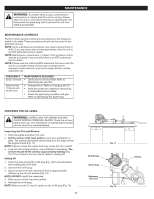
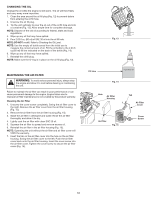
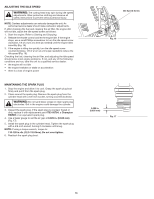
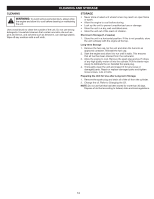
MAINTENANCE WARNING: To prevent serious injury, never perform maintenance or repairs while the unit is running. Always allow the unit to cool before servicing or repairing the unit. Disconnect the spark plug wire to prevent the unit from starting accidentally. MAINTENANCE SCHEDULE Perform these required maintenance procedures at the frequency stated in the table. These procedures should also be a part of any seasonal tune-up. NOTE: Some maintenance procedures may require special tools or skills. If you are unsure about these procedures, take the unit to an MTD authorized service dealer. NOTE: Maintenance, replacement, or repair of the emission control devices and system may be performed by an MTD authorized service dealer. NOTE: Please read the California/EPA statement that came with the unit for a complete listing of terms and coverage for the emissions control devices, such as the spark arrestor, muffler, carburetor, etc. FREQUENCY Every 10 hours After the first 10 hours and at 38 hours MAINTENANCE REQUIRED • Clean and re-oil the air filter. Refer to Maintaining the Air Filter. • Change the oil. Refer to Changing the Oil. • Have the rocker arm clearance checked by an authorized service dealer. • Check the spark plug condition and gap. Refer to Maintaining the Spark Plug. CHECKING THE OIL LEVEL WARNING: OVERFILLING THE CRANKCASE MAY CAUSE SERIOUS PERSONAL INJURY. Check the oil level before each use. The importance of maintaining the proper oil level cannot be overemphasized. Inspecting the Oil Level Window 1. Stop the engine and allow it to cool. 2. Set the unit on a flat, level surface, such as a workbench or table. The cutting head shield should hang over the edge so that the engine is level (Fig. 11). NOTE: Failure to keep the engine level may cause the oil to overfill. 3. Look into the oil level window; use a flashlight if necessary. The oil level should fill the window approximately halfway (Fig. 12). If the oil level is too low, add oil. Refer to Adding Oil. Adding Oil 1. Clean the area around the oil fill plug (Fig. 12) to prevent debris from entering the oil fill hole. 2. Unscrew the oil fill plug. 3. Add oil to the oil fill hole until the oil level is approximately halfway up the oil level window (Fig. 12). NOTE: DO NOT overfill the crankcase. 4. Wipe up any oil that may have spilled. 5. Reinstall the oil fill plug. NOTE: Make sure the O-ring is in place on the oil fill plug (Fig. 12). 11 Oil Fill Plug Oil Fill Hole Maximum Oil Level Fig. 11 Fig. 12 O-Ring
-
 1
1 -
2
-
3
-
4
-
5
-
 6
6 -
 7
7 -
 8
8 -
 9
9 -
 10
10 -
 11
11 -
 12
12 -
 13
13 -
 14
14 -
 15
15 -
 16
16 -
17
-
18
-
19
-
20
-
21
-
22
-
23
-
24
-
25
-
26
-
27
-
28
-
29
-
30
-
31
-
32
-
33
-
34
-
35
-
36
-
37
-
38
-
39
-
40
-
41
-
42
-
43
-
44
-
45
-
46
-
47
-
48
 |
 |