Cub Cadet Challenger MX 550 Yellow Operation Manual - Page 19
Check Fuel Line & Fuel Filter, Battery, Adjusting Toe-In, Cleaning the Spark Arrestor &
 |
View all Cub Cadet Challenger MX 550 Yellow manuals
Add to My Manuals
Save this manual to your list of manuals |
Page 19 highlights
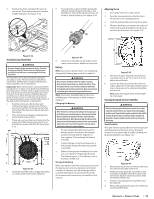
2. Remove the drain and allow the water to run out (a). Then replace the drain and the middle skid plate. See Figure 5-32. (a) 5. To remove the in-line fuel filter clamps (b), slide the clamps (b) away from the in-line fuel filter (a). Twist and pull the fuel lines off of the in-line fuel filter (a). See Figure 5-34. (a) (b) Adjusting Toe-In 1. Park utility vehicle on a flat surface. 2. Turn the steering wheel so that the front wheels are in the straight position. 3. Lock the parking brake and stop the engine. 4. Measure the distance between the center of the front tires at hub height on the front (a) and rear (b) of the tires. See Figure 5-35. (c) Figure 5-32 Check Fuel Line & Fuel Filter WARNING Be sure to stop the engine and remove the key. Check the fuel lines periodically. The fuel lines are subject to wear and old fuel may leak onto a running engine which may cause a fire. The fuel line connections should be checked annually or every 100 service hours whichever comes first. The fuel line is made of rubber and wears regardless of service period. Important: When the fuel line is disconnected for maintenance or repair, close both ends of the fuel line with a piece of clean cloth or paper to prevent dust and dirt from entering. Particular care must be taken not to allow dust and dirt into the fuel pump entrance. Even a small amount of dust or dirt cause premature wear and the malfunction of the fuel pump and injector components. 1. Park the vehicle on a flat surface and remove the engine access panel. There is a primary fuel filter on the gas tank and an in-line fuel filter between the gas tank and the engine. 2. If the fuel line and clamps are damaged or deteriorated, replace them. 3. There are two main lines (a) coming into the primary fuel filter (b) and one main line (c) exiting the primary fuel filter (b). See Figure 5-33. (c) (a) (a) (b) Figure 5-33 4. Check the fuel filter, if it is clogged by debris or contaminated with water, replace it. (b) Figure 5-34 6. Check the in-line filter (a) for debris and/or water contamination. Replace as necessary. Battery Note: If you store a battery that is not completely charged, the battery may need to be replaced. WARNING Never remove the battery while the engine is running. Keep electrolyte away from eyes, hands and clothes. If you are spattered with it, wash it away completely with water immediately and get medical attention. Wear eye protection and rubber gloves when working around the battery. Note: The factory installed battery is the nonrefillable type. If the battery is weak, charge or replace it. Charging the Battery WARNING When the battery is being active, hydrogen and oxygen gases in the battery are extremely explosive. Keep open sparks and flames away from the battery at all times, especially when charging the battery. When disconnecting the cable from the battery start with the negative terminal; when connecting the cable to the battery start with the positive terminal. Always check battery charge by using a voltmeter. 1. To slow charge the battery connect the battery positive terminal to the charger positive terminal and the negative to the negative. Then recharge the battery normally. 2. A boost charge is only for emergencies, it will partially charge the battery as quickly as possible. 3. When exchanging an old battery for a new one, use a battery of equal specification. The battery type is a 12 volt battery with a minimum of 300 CCA. Storing the Battery When storing the vehicle for a long period, remove the battery and store in a dry place out of direct sunlight. The battery will self-discharge while it is stored. Recharge it once every three months in hot seasons and once every six months in cold seasons. (a) (b) Figure 5-35 5. The front distance should be shorter than rear distance by 0-.47" (0-12 mm) (c). If not, adjust tie rod length. 6. Loosen the lock nut and turn the inner tie rod to adjust the rod length until the proper toe-in measurement is obtained. Retighten the lock nut. Note: Keep the length of the left and right tie-rods equal. Cleaning the Spark Arrestor & Muffler WARNING Before touching any part of the exhaust system, be sure that it has had sufficient time to cool. Always wear safety goggles and face mask. The particulate matter contained in the muffler contains chemicals that are harmful to people, animals and marine life. If you are unable to do this work, have it done by your dealer. Spark Arrestor The spark arrestor (a) should be removed, inspected and cleaned every 100 hours of use. The spark arrestor (a) is located inside of muffler (b) body and fastened with bolts. See Figure 5-36. (b) (a) Figure 5-36 1. Remove the back cover and loosen the bolts and remove the spark arrester (a). 2. Shake loosened particles out of the screen assembly and lightly clean the screen with wire brush. Soak in solvent and clean with wire brush if necessary. 3. If there is any damage, the assembly must be replaced. 4. Return the spark arrester (a) to the muffler (b) and reinstall the bolts. Section 5 - Product Care 19
-
 1
1 -
2
-
3
-
4
-
5
-
6
-
7
-
8
-
9
-
10
-
11
-
12
-
13
-
 14
14 -
 15
15 -
 16
16 -
 17
17 -
 18
18 -
 19
19 -
 20
20 -
 21
21 -
 22
22 -
 23
23 -
 24
24
 |
 |
