Cub Cadet Challenger MX 550 Yellow Operation Manual - Page 20
Notes
 |
View all Cub Cadet Challenger MX 550 Yellow manuals
Add to My Manuals
Save this manual to your list of manuals |
Page 20 highlights
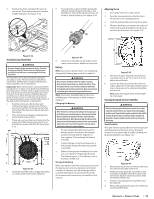
Muffler 1. Visually check the muffler for cracks or holes in the body, weldment or pipes at regular intervals. 2. USDA Forestry Division approval requires clearance between spark arrestor sleeve and muffler body to be no larger than 0.023" (0.584 mm). 3. Replace the entire muffler if it is damaged. 4. Do not operate the vehicle with a damaged muffler. Storage WARNING Do not clean the vehicle when the engine is running. To avoid the danger of exhaust fume poisoning, do not operate the engine in a closed building without proper ventilation. When storing, remove the key from the key switch to avoid unauthorized persons from operating the vehicle and getting injured. If you intend to store your vehicle for an extended period of time, follow the procedures outlined below. These procedures will ensure that the vehicle is ready to operate with minimum preparation when it is removed from storage. 1. Check the bolts and nuts for looseness and tighten if necessary. 2. Apply grease to vehicle areas where bare metal will rust and also to pivot areas. 3. Unload from the cargo bed. 4. Inflate tires to 20 psi each. 5. Change the engine oil and run the engine to circulate oil throughout the engine block and internal moving parts for about 5 minutes. 6. With all implements lowered to the ground, coat any exposed rods with grease (if equipped). 7. Remove the battery from the vehicle. Store the battery following the battery storage procedures. 8. Keep the vehicle in a dry place where the vehicle is sheltered from the elements. Cover the vehicle. 9. Keep the vehicle indoors in a dry area that is protected from sunlight and excessive heat. If the vehicle must be stored outdoors. Cover it with a waterproof tarpaulin. 10. Put boards under the tires to keep dampness away from tires. 11. Keep the tires out of direct sunlight and extreme heat. Important: When washing the vehicle, be sure to stop the engine. Allow sufficient time for the engine to cool before washing. Do not wash with a high-pressure pressure washer. Cover the vehicle after the muffler and the engine have cooled down. Removing the Vehicle from Storage 1. Check the tire air pressure and adjust to recommended pressures indicated on vehicle. 2. Install battery. Before installing the battery, make sure it is fully charged. 3. Check all fluid levels (engine oil, axle case oil, engine coolant and any attached implements). 4. Start the engine. Check to see if the engine cooling fan works. Observe all gauges. 5. If all gauges are functioning properly and reading normal and the cooling fan is working, move the vehicle outside. 6. Once outside, park the vehicle and let the engine idle for at least 5 minutes. Shut the engine off. Work around vehicle and make a visual inspection looking for evidence of oil or water leaks. 7. With the engine fully warmed up, release the parking brake and test the brakes for proper adjustment as you move forward. Adjust the parking brake as necessary. Notes 20 Section 5 - Product Care
-
 1
1 -
2
-
3
-
4
-
5
-
6
-
7
-
8
-
9
-
10
-
11
-
12
-
13
-
14
-
 15
15 -
 16
16 -
 17
17 -
 18
18 -
 19
19 -
 20
20 -
 21
21 -
 22
22 -
 23
23 -
 24
24
 |
 |
