Cub Cadet LTX 1040 LTX 1040 Operator's Manual - Page 21
Lubrication - attachments
 |
View all Cub Cadet LTX 1040 manuals
Add to My Manuals
Save this manual to your list of manuals |
Page 21 highlights
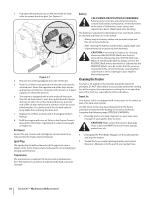
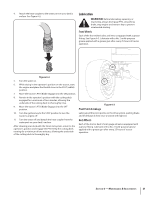
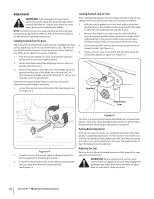
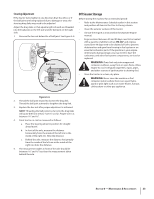
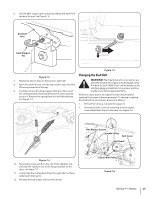
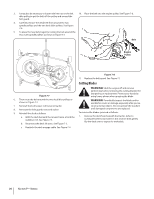
4. Attach the hose coupler to the water port on your deck's surface. See Figure 6-2. Lubrication WARNING! Before lubricating, repairing, or inspecting, always disengage PTO, set parking brake, stop engine and remove key to prevent unintended starting. Front Wheels Each of the front wheel axles and rims is equipped with a grease fitting. See Figure 6-3. Lubricate with a No. 2 multi-purpose grease applied with a grease gun after every 25 hours of tractor operation. Figure 6-2 5. Turn the water on. 6. While sitting in the operator's position on the tractor, start the engine and place the throttle lever in the FAST (rabbit) position. 7. Move the tractor's PTO (Blade Engage) into the ON position. 8. Remain in the operator's position with the cutting deck engaged for a minimum of two minutes, allowing the underside of the cutting deck to thoroughly rinse. 9. Move the tractor's PTO (Blade Engage) into the OFF position. 10. Turn the ignition key to the STOP position to turn the tractor's engine off. 11. Turn the water off and detach the hose coupler from the water port on your deck's surface. After cleaning your deck with the Smart Jet system, return to the operator's position and engage the PTO. Keep the cutting deck running for a minimum of two minutes, allowing the underside of the cutting deck to thoroughly dry. Figure 6-3 Pivot Points & Linkage Lubricate all the pivot points on the drive system, parking brake and lift linkage at least once a season with light oil. Deck Wheels Each of the tractor deck's front gauge wheels is equipped with a grease fitting. Lubricate with a No. 2 multi-purpose grease applied with a grease gun after every 25 hours of tractor operation. Section 6 - Maintenance & Adjustments 21
-
 1
1 -
2
-
3
-
4
-
5
-
6
-
7
-
8
-
9
-
10
-
11
-
12
-
13
-
14
-
15
-
 16
16 -
 17
17 -
 18
18 -
 19
19 -
 20
20 -
 21
21 -
 22
22 -
 23
23 -
 24
24 -
 25
25 -
 26
26 -
27
-
28
-
29
-
30
-
31
-
32
-
33
-
34
-
35
-
36
-
37
-
38
-
39
-
40
-
41
-
42
-
43
-
44
-
45
-
46
-
47
-
48
-
49
-
50
-
51
-
52
-
53
-
54
-
55
-
56
-
57
-
58
-
59
-
60
-
61
-
62
-
63
-
64
-
65
-
66
-
67
-
68
-
69
-
70
-
71
-
72
 |
 |
