Cub Cadet LTX 1050 KW LTX 1046 KW Operator's Manual - Page 20
Changing the Engine Oil on Kohler Engines, Air Cleaner, Spark Plug, Hydrostatic Transmission
 |
View all Cub Cadet LTX 1050 KW manuals
Add to My Manuals
Save this manual to your list of manuals |
Page 20 highlights
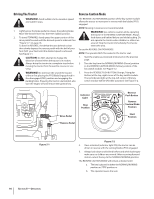
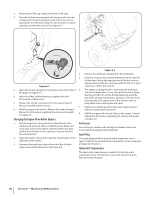
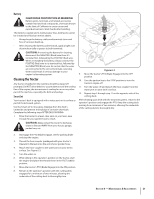
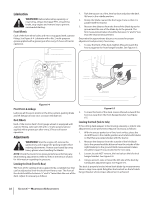
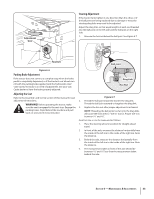
3. Remove the oil fill cap/ dipstick from the oil fill tube. 4. Push the oil drain hose (packed with this manual) onto the oil drain port. Route the opposite end of the hose into an appropriate oil collection container with at least a 2.5 quart capacity, to collect the used oil. See Figure 6-1. Figure 6-1 5. Open the oil drain plug by loosening the bolt on the side of the plug. See Figure 6-1. 6. After the oil has finished draining, retighten the bolt. Remove the oil drain hose. 7. Replace the oil filter as instructed in the engine Owner's Manual included with the tractor. 8. Refill the engine with new oil. Refer to the engine Owner's Manual for information regarding the volume and weight of engine oil. Changing the Engine Oil on Kohler Engines 1. Run the engine for a few minutes to allow the oil in the crankcase to warm up. Warm oil will flow more freely and carry away more of the engine sediment which may have settled at the bottom of the crankcase. Use care to avoid burns from hot oil. 2. Open the tractor's hood and locate the oil drain port on the right side of the engine. 3. Pop open the protective cap on the end of the oil drain valve to expose the drain port. See Figure 6-2. Figure 6-2 4. Remove the oil fill cap/ dipstick from the oil fill tube. 5. Push the oil drain hose (packed with this manual) onto the oil drain port. Route the opposite end of the hose into an appropriate oil collection container with at least a 2.5 quart capacity, to collect the used oil. 6. The engine is equipped with a twist-and-pull drain port. Turn the oil drain valve 1⁄4-turn, then pull outward to begin draining oil. After the oil has finished draining, push the end of the oil drain valve back in and turn 1⁄4-turn to secure it back in place. Re-cap the end of the oil drain valve to keep debris from entering the drain port. 7. Replace the oil filter as instructed in the engine Owner's Manual included with the tractor. 8. Refill the engine with new oil. Refer to the engine Owner's Manual for information regarding the volume and weight of engine oil. Air Cleaner Service the pre-cleaner and cartridge/air cleaner element as instructed in the engine Owner's Manual. Spark Plug The spark plug should be cleaned and the gap reset once a season. Refer to the engine Owner's Manual for correct plug type and gap specifications. Hydrostatic Transmission The hydrostatic transmission is sealed at the factory and is maintenance-free. The fluid level cannot be checked and the fluid cannot be changed. 20 Section 6 - Maintenance & Adjustments
-
 1
1 -
2
-
3
-
4
-
5
-
6
-
7
-
8
-
9
-
10
-
11
-
12
-
13
-
14
-
 15
15 -
 16
16 -
 17
17 -
 18
18 -
 19
19 -
 20
20 -
 21
21 -
 22
22 -
 23
23 -
 24
24 -
 25
25 -
26
-
27
-
28
-
29
-
30
-
31
-
32
-
33
-
34
-
35
-
36
-
37
-
38
-
39
-
40
-
41
-
42
-
43
-
44
-
45
-
46
-
47
-
48
-
49
-
50
-
51
-
52
-
53
-
54
-
55
-
56
-
57
-
58
-
59
-
60
-
61
-
62
-
63
-
64
-
65
-
66
-
67
-
68
-
69
-
70
-
71
-
72
 |
 |
