Cub Cadet LTX 1050 KW LTX 1046 KW Operator's Manual - Page 21
Cleaning the Tractor - transmission
 |
View all Cub Cadet LTX 1050 KW manuals
Add to My Manuals
Save this manual to your list of manuals |
Page 21 highlights
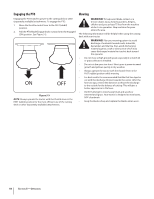
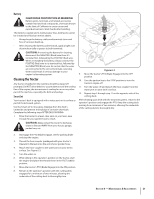
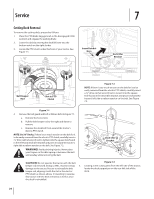
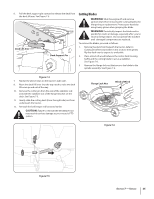
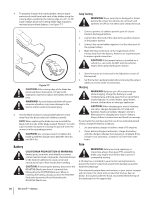
Battery CALIFORNIA PROPOSITION 65 WARNING! Battery posts, terminals, and related accessories contain lead and lead compounds, chemicals known to the State of California to cause cancer and reproductive harm. Wash hands after handling. The battery is sealed and is maintenance-free. Acid levels cannot be checked and fluid can not be added. • Always keep the battery cables and terminals clean and free of corrosive build-up. • After cleaning the battery and terminals, apply a light coat of petroleum jelly or grease to both terminals. CAUTION: If removing the battery for cleaning, disconnect the NEGATIVE (Black) wire from it's terminal first, followed by the POSITIVE (Red) wire. When re-installing the battery, always connect the POSITIVE (Red) wire to its terminal first, followed by the NEGATIVE (Black) wire. Be certain that the wires are connected to the correct terminals; reversing them could result in serious damage to your engine's alternating system. Cleaning the Tractor Any fuel or oil spilled on the machine should be wiped off promptly. Do NOT allow debris to accumulate around the cooling fins of the engine, the transmission's cooling fan or on any other part of the machine, especially the belts and pulleys. Smart Jet Your tractor's deck is equipped with a water port on its surface as part of its deck wash system. Use the Smart Jet to rinse grass clippings from the deck's underside and prevent the buildup of corrosive chemicals. Complete the following steps AFTER EACH MOWING: 1. Drive the tractor to a level, clear spot on your lawn, near enough for your garden hose to reach. CAUTION: Make certain the tractor's discharge chute is directed AWAY from your house, garage, parked cars, etc. Figure 6-3 9. Move the tractor's PTO (Blade Engage) into the OFF position. 10. Turn the ignition key to the STOP position to turn the tractor's engine off. 11. Turn the water off and detach the hose coupler from the water port on your deck's surface. 12. Repeat step 2 through step 11 on the opposite side of the cutting deck. After cleaning your deck with the Smart Jet system, return to the operator's position and engage the PTO. Keep the cutting deck running for a minimum of two minutes, allowing the underside of the cutting deck to thoroughly dry. 2. Disengage the PTO (Blade Engage), set the parking brake and stop the engine. 3. Thread the hose coupler (packaged with your tractor's Operator's Manual) onto the end of your garden hose. 4. Attach the hose coupler to the water port on your decks surface. See Figure 6-3. 5. Turn the water on. 6. While sitting in the operator's position on the tractor, start the engine and place the throttle lever in the FAST (rabbit) position. 7. Move the tractor's PTO (Blade Engage) into the ON position. 8. Remain in the operator's position with the cutting deck engaged for a minimum of two minutes, allowing the underside of the cutting deck to thoroughly rinse. Section 6 - Maintenance & Adjustments 21
-
 1
1 -
2
-
3
-
4
-
5
-
6
-
7
-
8
-
9
-
10
-
11
-
12
-
13
-
14
-
15
-
 16
16 -
 17
17 -
 18
18 -
 19
19 -
 20
20 -
 21
21 -
 22
22 -
 23
23 -
 24
24 -
 25
25 -
 26
26 -
27
-
28
-
29
-
30
-
31
-
32
-
33
-
34
-
35
-
36
-
37
-
38
-
39
-
40
-
41
-
42
-
43
-
44
-
45
-
46
-
47
-
48
-
49
-
50
-
51
-
52
-
53
-
54
-
55
-
56
-
57
-
58
-
59
-
60
-
61
-
62
-
63
-
64
-
65
-
66
-
67
-
68
-
69
-
70
-
71
-
72
 |
 |
