Cub Cadet PRO Z 972 SDL Operation Manual - Page 25
Front Tire Removal/Replacement
 |
View all Cub Cadet PRO Z 972 SDL manuals
Add to My Manuals
Save this manual to your list of manuals |
Page 25 highlights
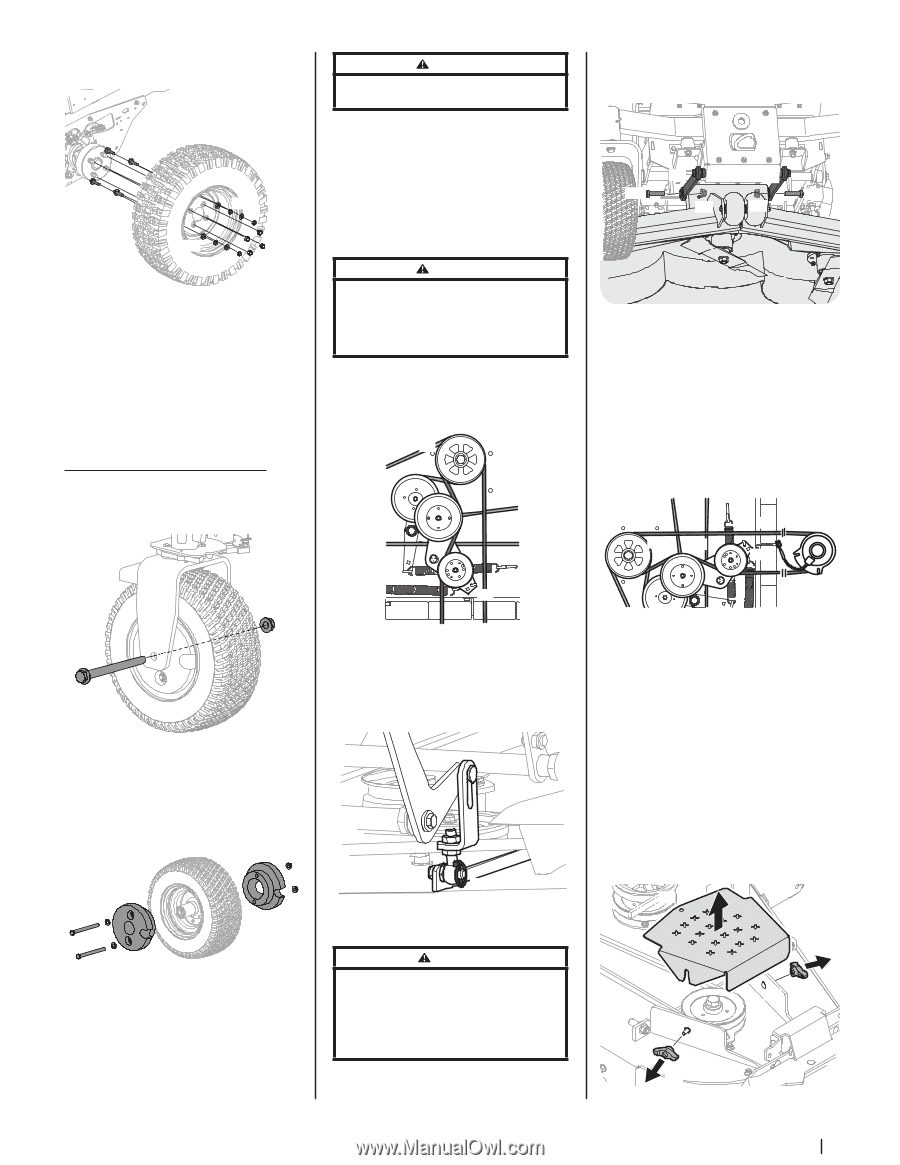
3. Remove the four lug nuts (a) to remove the inner tire. See Figure 4-16. (b) (d) (c) (a) Figure 4-16 4. If replacing the inner tire, remove the four hex screws (b), washers (c) and jam nuts (d) that hold the mounting screws in place for the dual wheel adapter. See Figure 4-16. 5. Reinstall the tires by reversing the previous steps. Lug nuts should be tightened to 65-70 ft-lbs and the jam nuts should be tightened to 42-48 ft-lbs. Front Tire Removal/Replacement 1. Remove the hex screw (a) and flange lock nut (b) that secures the front wheel (c) to the yoke assembly (d). See Figure 4-17. (d) (c) (b) (a) Figure 4-17 2. Remove the two 25-lb weights (a) on each tire by removing the two hex screws (b), flat washers (c) and flange lock nuts (d) that secure them to the rims. See Figure 4-18. (d) (c) (b) (d) (a) (b) (c) (a) Figure 4-18 3. To re-install or replace the front tire, reverse steps 1 and 2. Tighten the hardware in step 2 to 65-75 ft-lbs and the hardware in step 1 to 75-90 ft-lbs. WARNING Do not operate the tractor without the wheel weights in place. Deck Removal Remove the mower deck from the tractor as follows: 1. Lower the deck to the ground. Capture the deck lift by placing the clevis pin behind the lowest position. 2. Apply the parking brake. Remove ignition key and the spark plug cap. WARNING The muffler and any surrounding parts at the rear of the tractor may be extremely hot, and could cause serious burns. Use extreme caution when near the muffler. Allow the muffler to fully cool before removing the belt from the PTO pulley. 4. Using a 1⁄2" drive in the idler pulley bracket (a), turn the wrench towards the right of the tractor and slide the PTO belt (b) off the PTO pulley (c). See Figure 4-19. (c) (b) (a) Figure 4-19 5. Remove the four lynch pins (a) that secure the deck to the deck lift assembly. See Figure 4-20. (a) Figure 4-20 CAUTION The spring is under tension due to the weight of the deck. When removing the lift linkage from the deck the tension of the springs will go from the deck to the deck lift pedal. Not capturing the deck lift pedal by placing the clevis pin behind the lowest position while removing the lift linkage from the deck will cause it to snap back. 6. Remove the hex screws (a) flange lock nuts (b) securing the front deck control rods (c) to the deck. See Figure 4-21. (c) (a) (b) (c) (a) (b) Figure 4-21 7. Turn front wheels as if to make a pivot turn. 8. Shift the deck toward the right side of the mower and remove. 9. To install reverse the process. Replacing the PTO Belt 1. Remove the PTO belt (a) from the deck as instructed in the Deck Removal section then remove it from around the PTO clutch. See Figure 4-22. (a) (b) (d) (c) Figure 4-22 2. Route the PTO belt (a) as shown in Figure 4-22. After routing the belt around the PTO pulley (b), use a 1⁄2" drive in the idler pulley bracket (c) and turn towards the right of the tractor to finish routing the belt around the idler pulley (d). 3. Reinstall the deck by reversing the previous steps. Replacing the Deck Belt 1. Set the parking brake. Remove ignition key and both spark plug caps. 2. Remove the PTO belt, (refer to Deck Removal on page 24). 3. To remove the belt covers (a) , remove the wing knobs (b) from the carriage screws (c) securing it to the deck. See Figure 4-23. (a) (b) (c) (c) (b) Figure 4-23 Section 4 - Product Care 25
-
 1
1 -
2
-
3
-
4
-
5
-
6
-
7
-
8
-
9
-
10
-
11
-
12
-
13
-
14
-
15
-
16
-
17
-
18
-
19
-
 20
20 -
 21
21 -
 22
22 -
 23
23 -
 24
24 -
 25
25 -
 26
26 -
 27
27 -
 28
28 -
 29
29 -
 30
30 -
31
-
32
 |
 |