Cub Cadet TANK SZ 60 TANK SZ 48 Operator's Manual - Page 35
Replacing the Deck Belt, Replacing the Blades
 |
View all Cub Cadet TANK SZ 60 manuals
Add to My Manuals
Save this manual to your list of manuals |
Page 35 highlights
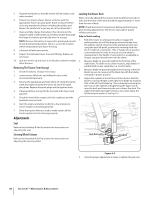
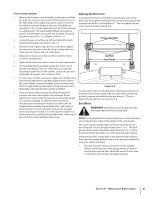
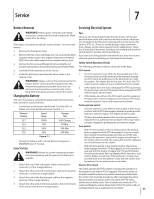
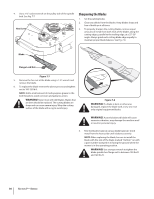
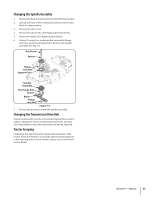
2. Route the PTO belt as shown in Fig. 7-5. After routing the belt around the PTO pulley, use a 1⁄2" drive in the idler pulley bracket and turn towards the right of the tractor to finish routing the belt around the idler pulley. 3. Reinstall the deck. Replacing the Deck Belt 1. Set the parking brake. Remove ignition key and both spark plug caps. 2. Remove the deck from beneath the tractor and remove the PTO belt, (refer to Deck Removal). 3. Pull the four draw latches up and away from the deck covers to unlatch and remove both covers. See Fig. 7-6. Draw Latches WARNING! Avoid pinching injuries. Never place your fingers on the idler spring or between the belt and a pulley while removing the belt. 5. Route the new belt as shown in Fig. 7-7. Then reinstall the deck and PTO belt as instructed on pages 33-34 NOTE: When replacing belts do not overtighten. Adjust the idler pulley so that a ten-pound pull with a spring scale between two pulleys deflects the belt about 1⁄2". Replacing the Blades WARNING! Before performing any maintenance, disengage the PTO, engage the parking brake lever, turn the ignition key to the "OFF" position and remove the key from the switch. Protect your hands by using heavy gloves when handling the blades. When servicing the mower deck, be careful not to cut yourself on the sharpened blades. 1. Remove the deck as instructed in the Deck Removal section. 2. Jack up the front of the mowing deck about one foot and block it in that position. 3. Wrap a rag around one end of the blade and grasp it to prevent it from turning, or secure the blade by placing a block of wood between the blade and the deck housing. See Fig. 7-8. Figure 7-6 4. Using a 1⁄2" drive insert the male end into the 1⁄2" square opening in the deck idler assembly and rotate the idler clockwise on the 60" deck and counter-clockwise on the 48" deck. See Fig. 7-7. While holding the deck idler, loosen the deck belt from the pulley and slide the belt away from the pulley. 60" Deck 48" Deck Deck Idler Bracket Deck Idler Bracket Figure 7-8 Figure 7-7 Section 7 - Service 35
-
 1
1 -
2
-
3
-
4
-
5
-
6
-
7
-
8
-
9
-
10
-
11
-
12
-
13
-
14
-
15
-
16
-
17
-
18
-
19
-
20
-
21
-
22
-
23
-
24
-
25
-
26
-
27
-
28
-
29
-
 30
30 -
 31
31 -
 32
32 -
 33
33 -
 34
34 -
 35
35 -
 36
36 -
 37
37 -
 38
38 -
 39
39 -
 40
40 -
41
-
42
-
43
-
44
 |
 |