Cub Cadet Z-Force 48 Z-Force 48 Operator's Manual - Page 17
Driving the Tractor - battery
 |
View all Cub Cadet Z-Force 48 manuals
Add to My Manuals
Save this manual to your list of manuals |
Page 17 highlights
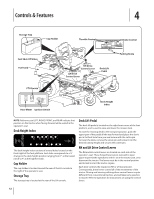
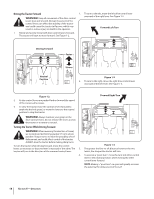
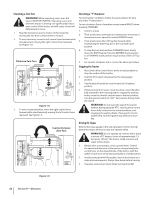
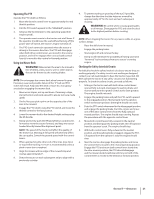
Stopping the Engine 1. Place the PTO switch in the "OFF" position. 2. Move the RH and LH drive control levers to the neutral position. 3. Engage the parking brake. 4. Move the throttle control to midway between the SLOW and FAST positions. 5. Turn the ignition key to the "OFF" position and remove the key from the ignition switch. NOTE: Always remove the key from the ignition switch to prevent accidental starting or battery discharge if the equipment is left unattended. Practice Operation (Initial Use) Operating a zero-turn tractor is not like operating a conventional type riding tractor. Although and because a zero turn tractor is more maneuverable, getting used to operating the control levers takes some practice. We strongly recommend that you locate a reasonably large, level and open "practice area" where there are no obstructions, pedestrians, or animals. You should practice operating the tractor for a minimum of 30 minutes. Carefully move (or have moved) the tractor to the practice area. When performing the practice session, the PTO should not be engaged. While practicing, operate the tractor at approximately 1⁄2-3⁄4 throttle and at less than full speed in both forward and reverse. Use protective equipment for eyes, hands, hearing, feet, legs, head and other areas of the body if needed - safety eye glasses, gloves, earplugs, boots, hats, etc. WARNING! Hearing Protection is required for all operator exposure exceeding two (2) hours. Carefully practice maneuvering the tractor using the instructions in the following section "Driving the Tractor." Practice until you are confident that you can safely operate the tractor. G ON SLOW FAST CHOKE ON START NEUTRAL OFF BRAKE WARNING Driving the Tractor WARNING! Avoid sudden starts, excessive speed and sudden stops. 1. Adjust the operator's seat to the most comfortable position that allows you to operate the controls. See seat adjustment in the Maintenance & Adjustments section. 2. Release the parking brake. 3. Move the RH and LH drive control levers inward in the neutral position. Refer to Figure 1-1. Control Lever Moved Inward and in Neutral Figure 1-1 NOTE: If the control levers are not even in the neutral position, refer to Maintenance & Adjustments for instructions to adjust the levers so that they are even. 4. Move the throttle control lever forward to the full throttle position (3525-3550 RPM). NOTE: Although the tractor's engine is designed to run at full throttle, when performing a practice session the tractor must be operated at less than full throttle (approximately 2000-2500 RPM). This only applies to practice. WARNING! Always maintain a firm grip on the control levers. DO NOT release the control levers to slow or stop the tractor; move levers to neutral position using your hands. 5. To drive the tractor, firmly grasp the respective drive control levers with your right and left hands and continue with Driving the Tractor Forward on the following page. RUN STOP START Section 5 - Operation 17
-
 1
1 -
2
-
3
-
4
-
5
-
6
-
7
-
8
-
9
-
10
-
11
-
 12
12 -
 13
13 -
 14
14 -
 15
15 -
 16
16 -
 17
17 -
 18
18 -
 19
19 -
 20
20 -
 21
21 -
 22
22 -
23
-
24
-
25
-
26
-
27
-
28
-
29
-
30
-
31
-
32
-
33
-
34
-
35
-
36
-
37
-
38
-
39
-
40
 |
 |